Crunchy, garlicky, and pantry-friendly – Crispy fried garlic is an excellent addition to any dish. It adds savory and pungent flavors, whether you are having soups, noodles, or stir-fried dishes.
You only need two things to create this must-have seasoning: garlic and oil. When you are done deep-frying all the delicious garlic, keep the garlic-infused oil and use it as your oil for stir-frying or toasting dishes.
Why Make Crispy Fried Garlic And Garlic Oil
This recipe is for all garlic lovers out there! It is best for those who like to cook a large batch of garlic ready in advance. Add an extra crunch of garlic and pungent flavors in every bite by making your own crispy fried minced garlic bits.

When you have this in your pantry, you can serve garlic bits anytime you want or use them for a recipe. Of course, let’s not put the oil to waste.
After deep-frying the minced garlic, store the oil in an airtight container and use it as a drizzle in various dishes, including toasted bread, fried rice, and salads.

How To Use Fried Garlic And Garlic Oil
Keep a batch of fried garlic and garlic oil in your pantry to use as a topping, drizzle, or mix in several dishes. Here are some excellent ways how to use fried garlic and garlic oil if you like garlicky flavors.
Fried Garlic
- Rice topping for plain or fried rice
- Topping for sushi bowls, noodle soup, stews, rice porridge or congee, or ramen
- Pre-cooked ingredient for recipes needing minced garlic, such as garlic bok choy and tofu with minced pork & mushrooms
- Added ingredient for sauces like Chinese garlic sauce, homemade Chinese black bean sauce, marinara sauce, or red pepper sauce
- Topping for baked goods such as buns and bread like beef bao buns and char siu bao
- Topping for salads, stir-fried dishes, and tacos, to name a few
Garlic Oil
- Oil for sauté or stir-fried dishes
- Ingredient for dressings, dips, and sauces
- Dipping sauce for bread and baked goods
- Oil or drizzle for garlic fried rice
- Spread for toasted or baked bread
- Flavoring for pasta dishes, mashed potatoes, and soups
- Drizzle for poached or fried eggs
- Use for marinades with oil
Essential Cooking Tips For Fried Garlic And Garlic Oil
To have the best-tasting garlic, here are some essential cooking tips to keep in mind. I have written some of my suggestions when it comes to cooking methods, desired garlic color, and recipe techniques. So, before starting with the recipe, have a quick read on the following tips.
- Cooking method: Deep-frying is best to make a large batch of garlic bits in no time. Plus, you can be assured of an even frying on all sides of the minced garlic. Aside from deep-frying with a pan, you can also make this recipe with a microwave. Use a large microwave-safe bowl to place your minced garlic and oil. Then, microwave the bowl on high heat for 5 minutes while stirring from time to time with a heat-resistant stirrer. Stirring is important to separate garlic bits that stick together and cook all sides evenly. After 5 minutes, keep heating in 2-minute intervals and then 30-second intervals until you have a golden brown color.
- Golden brown color: Always keep a close watch so that the garlic does not burn and turn too dark. If it is too dark or almost burned, the taste will not be as pleasant as you want it to be. The color you are going for is a light golden brown. Once it turns this color, remove it from the oil and drain the excess oil.
- Rinse the garlic: Rinsing the minced garlic with water helps remove bitterness and remove any dirt left.
- Drain the garlic: Draining excess oil with a kitchen paper towel or parchment paper will keep the garlic bits dry and not too soggy when stored. If the garlic bits are soaked in oil when stored, you will lose the delightful crunch.
- Added seasoning: You can season the fried garlic with salt. Moreover, sugar-dusting is an excellent way to tone down its natural bitterness. It will not make it sweet but simply neutralize the flavor to a more desirable garlicky flavor. Dust the garlic bits with powdered sugar through a sieve.
- Food processor: Chopping a large batch of garlic can be a tedious task. To make it easier and faster to make minced garlic, you can use a food processor to grind the garlic into small bits. Remember, only pulse the food processor and do not grind for too long. Overgrinding will give you a paste rather than minced garlic.
- Whole pre-peeled garlic: If you don’t like to peel and press garlic, you can purchase whole peeled garlic in grocery stores. It saves you time and allows you to focus on chopping and frying.
- High-smoke point oil: Use cooking oil with a high smoke point to reduce the amount of oil oxidized and to suit better for cooking at high temperatures. Oils with a high smoke point are avocado, peanut, canola, and corn oil. Use olive, avocado, sesame, or safflower oil for a healthier option. If you want a neutral taste, go for peanut, soybean, and vegetable oil.
- Storage suggestions: Store the garlic bits in a glass jar or spice jar. For the garlic oil, it is best stored in a glass oil dispenser or glass jar. It should be in an airtight container and stored away from direct sunlight and heat. You can keep it for 1 week or more.
What You Need To Make Crispy Fried Garlic And Garlic Oil

I recommend a shallow pan to make it easier for deep-frying and stirring the garlic bits. To help you do the work faster, I also suggest using a strainer spatula to easily drain out the oil from the garlic.
Alternatively, a sieve would work fine as well. When it comes to the recipe ingredients it is generally up to you how much garlic and oil you want to use.
Kitchenware
- Knife and chopping board
- Mixing bowl
- Shallow pan for deep-frying
- Spatula or strainer spatula
- Baking sheet with parchment paper
- Glass jar for storage
Ingredients
- Whole heads of garlic (choose how many heads you want to cook)
- Water for rinsing the minced garlic
- Oil for deep-frying (enough to deep-fry all the garlic)
How To Make Crispy Fried Garlic And Garlic Oil
In a nutshell, this quick and easy recipe entails peeling and chopping the garlic and then deep-frying it in oil. The most important part of this recipe is to continuously stir it to cook it evenly and watch out for color changes. Watch my tutorial video on Instagram and Tiktok to learn more!
Prepare your garlic by separating each garlic clove.

Smash each garlic clove with a knife and peel off the skin.

After peeling all the garlic cloves, finely chop them to make minced garlic.

In a large bowl, place the minced garlic and pour water.
Rinse the minced garlic with water. This step helps reduce bitterness and remove impurities.

Then, remove the minced garlic and squeeze out excess water.

Next, prepare a shallow pan with enough oil for deep-frying.
Combine the minced garlic with the cold oil.

Deep-fry on low heat for 15 to 20 minutes while stirring continuously.

Afterward, wait until the bits of garlic float to the top of the oil and turn lightly golden brown.

Then, immediately transfer the fried minced garlic to a baking sheet lined with parchment paper. I suggest using a strainer spatula to drain oil from the garlic quickly.

Spread the garlic bits evenly on a single layer. It helps stop the garlic from cooking and burning from the residual temperature of the oil.

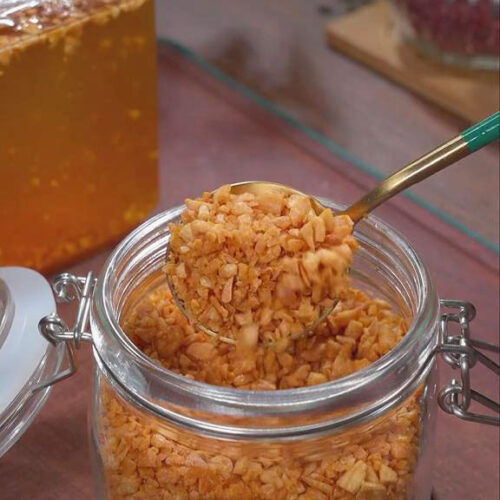
Once the garlic cools down, store it in a glass jar.

Lastly, pour the cooled oil into another glass jar or an oil container.
Serve the fried garlic and garlic oil as a topping, spreading, or dressing!

Crispy Fried Garlic Recipe
Equipment
- Knife and chopping board
- Shallow pan for deep-frying
- Spatula or strainer spatula
- Baking sheet with parchment paper
- Glass jar for storage
Ingredients
- Whole heads of garlic choose how many heads you want to cook
- Water for rinsing the minced garlic
- Oil for deep-frying enough to deep-fry all the garlic
Instructions
- Prepare your garlic by separating each garlic clove.
- Smash each garlic clove with a knife and peel off the skin.
- After peeling all the garlic cloves, finely chop them to make minced garlic.
- In a large bowl, place the minced garlic and pour water.
- Rinse the minced garlic with water. This step helps reduce bitterness and remove impurities.
- Then, remove the minced garlic and squeeze out excess water.
- Next, prepare a shallow pan with enough oil for deep-frying.
- Combine the minced garlic with the cold oil.
- Deep-fry on low heat for 15 to 20 minutes while stirring continuously.
- Afterward, wait until the bits of garlic float to the top of the oil and turn lightly golden brown.
- Then, immediately transfer the fried minced garlic to a baking sheet lined with parchment paper. I suggest using a strainer spatula to drain oil from the garlic quickly.
- Spread the garlic bits evenly on a single layer. It helps stop the garlic from cooking and burning from the residual temperature of the oil.
- Once the garlic cools down, store it in a glass jar.
- Lastly, pour the cooled oil into another glass jar or an oil container.
- Serve the fried garlic and garlic oil as a topping, spreading, or dressing!