This post may contain affiliate links. Please read our disclosure policy.
Cantonese congee is undoubtedly my favourite type of porridge and my family would always order congee whenever we dine at Crystal Jade.
For something seemingly so plain, Cantonese congee has a really rich flavour to it. And with its velvety smooth consistency, there is no reason not to love congee! I far prefer it to its Teochew counterpart, in which the rice grains are still whole and intact, and the broth is somewhat bland.
To me, Teochew porridge needs to be eaten with side dishes to lend flavour to its mild taste, whereas Cantonese congee is good enough to be eaten plain.
Growing up, I’ve eaten countless bowls of Teochew porridge at home, but hardly any Cantonese congee.
Perhaps the reason my family rarely made congee at home was because cooking congee is a very lengthy process since it takes hours for the rice grains to disintegrate.
If you do a Google search on how to make Cantonese-style congee in the shortest time possible, you’ll probably see that the most common recommendation is to freeze the rice grains prior to cooking.
I myself have tried that method, but unfortunately it didn’t work for me. While the rice grains did seem to disintegrate a little faster while cooking, it definitely did not achieve the kind of silky consistency found in Crystal Jade’s congee within 15-20 minutes.
Even after 30-45 minutes, I could still see whole grains of rice. One thing to take note is that if you are trying this method, do freeze your rice grains in a ziploc bag and not a bowl.
Silly me froze my rice grains in a bowl once and I had much difficulty dislodging the rice thereafter. I believe this method will help the congee cook faster, but if used as a stand-alone method, it will not give you that silky congee in 15 minutes.
Another method I’ve tried is blending the rice grains before cooking. Since what we want is for the rice grains to disintegrate into smaller pieces as quickly as possible, I thought blending the rice grains with a little water before cooking would be a good idea.
However, upon blending, the starch within the rice grains were released and acted as a glue to bind the grains together. I ended up with big lumps of rice, some of which could not be loosened during the cooking process.
I also cooked the congee for an hour but it did not attain the ideal consistency. Perhaps adding more water to the blending process would have done the job, but I can’t say for sure.
The final and most successful method I have tried is to blend the rice grains after cooking for 8-10 minutes. This is the method I will swear by, as it’s the fastest and most effective way to get your rice grains to disintegrate into porridge.
No big lumps of rice, and no ‘hassle’ of freezing the rice the day before. But you will need a big, deep pot and an immersion blender for this method.
All you have to do is blend the rice grains after they are cooked through, and you get a silky, creamy congee in a matter of 15 minutes! Read below for the recipe.
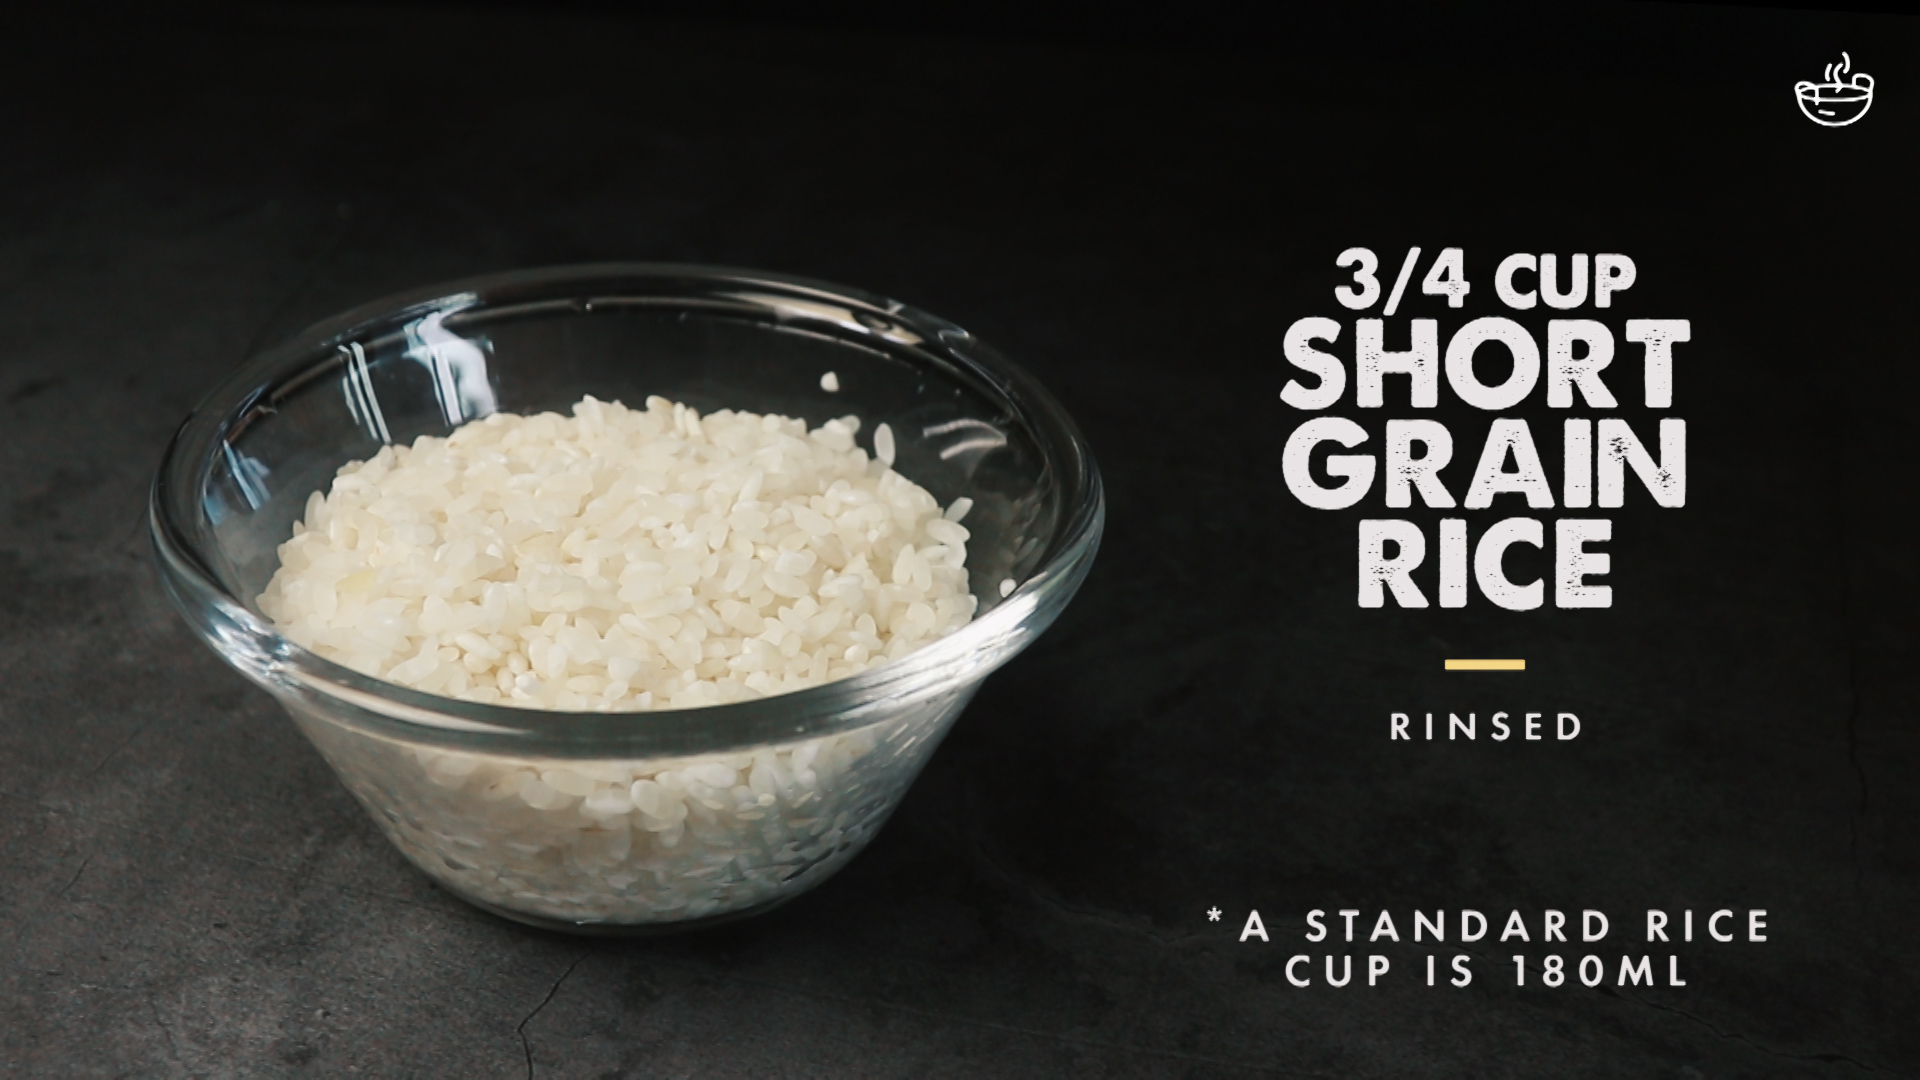
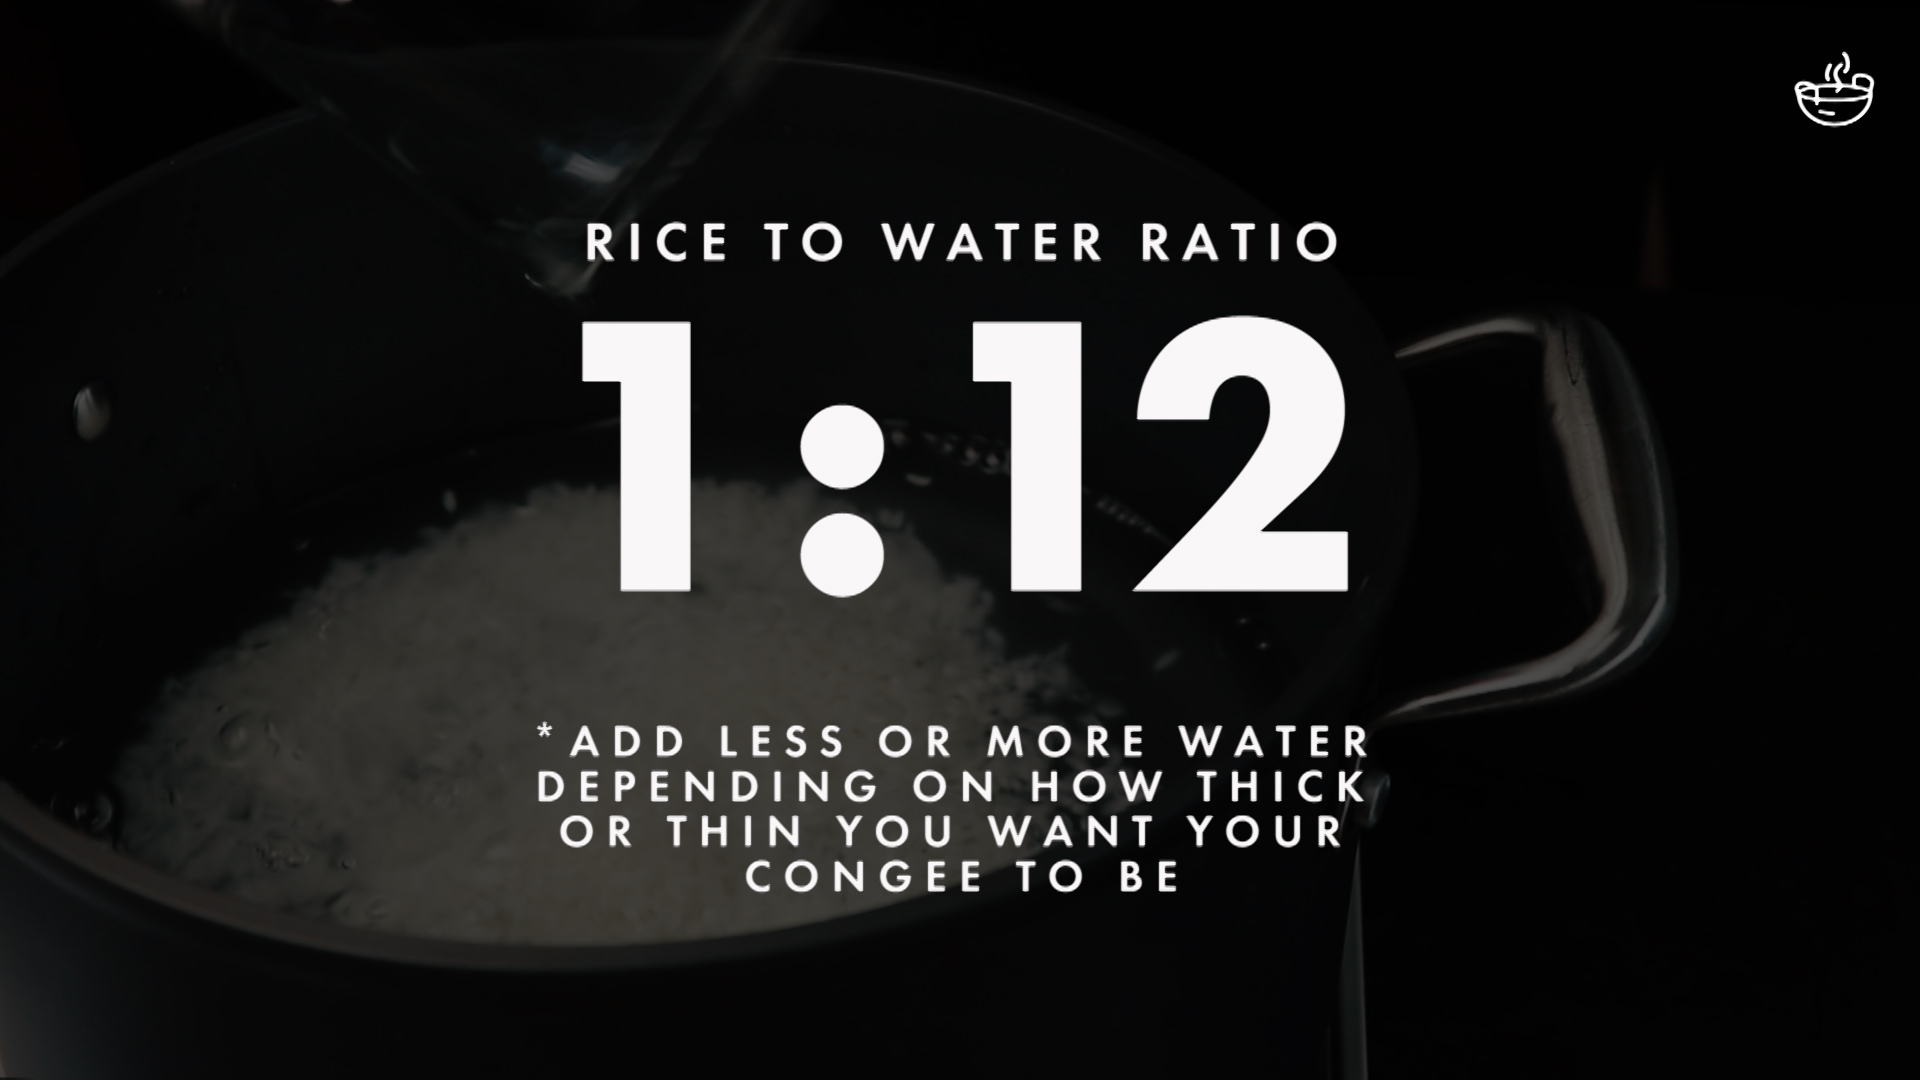
For about 4 servings, start with 3/4 cup of rice. Take note that I’m referring to a rice cup which is 180ml in size. I used short-grain Japanese rice but you can also use medium-grain Jasmine rice.
Short-grain rice tends to have higher starch content than medium-grain rice so you will have to adjust the amount of water according to the type of rice you use.
Rinse the rice, but not excessively as we need some of that starch to get the creamy texture.
The rice to water ratio I used is 1:12. So for 3/4 cup of rice, I used 9 rice cups of water, which amounted to 1620ml. Please don’t add 9 standard cups of water otherwise your congee will be extremely watery!
If you prefer slightly thicker congee, you can use 1 cup of rice to 10 cups of water. I felt that 12 cups of water was optimal for me, but again, the amount of water use depends on the type of rice you use, as well as the size of the pot.
The bigger the pot, the greater the surface area and the faster the rate of evaporation. In that case, you may have to add more water to compensate for the loss of water.
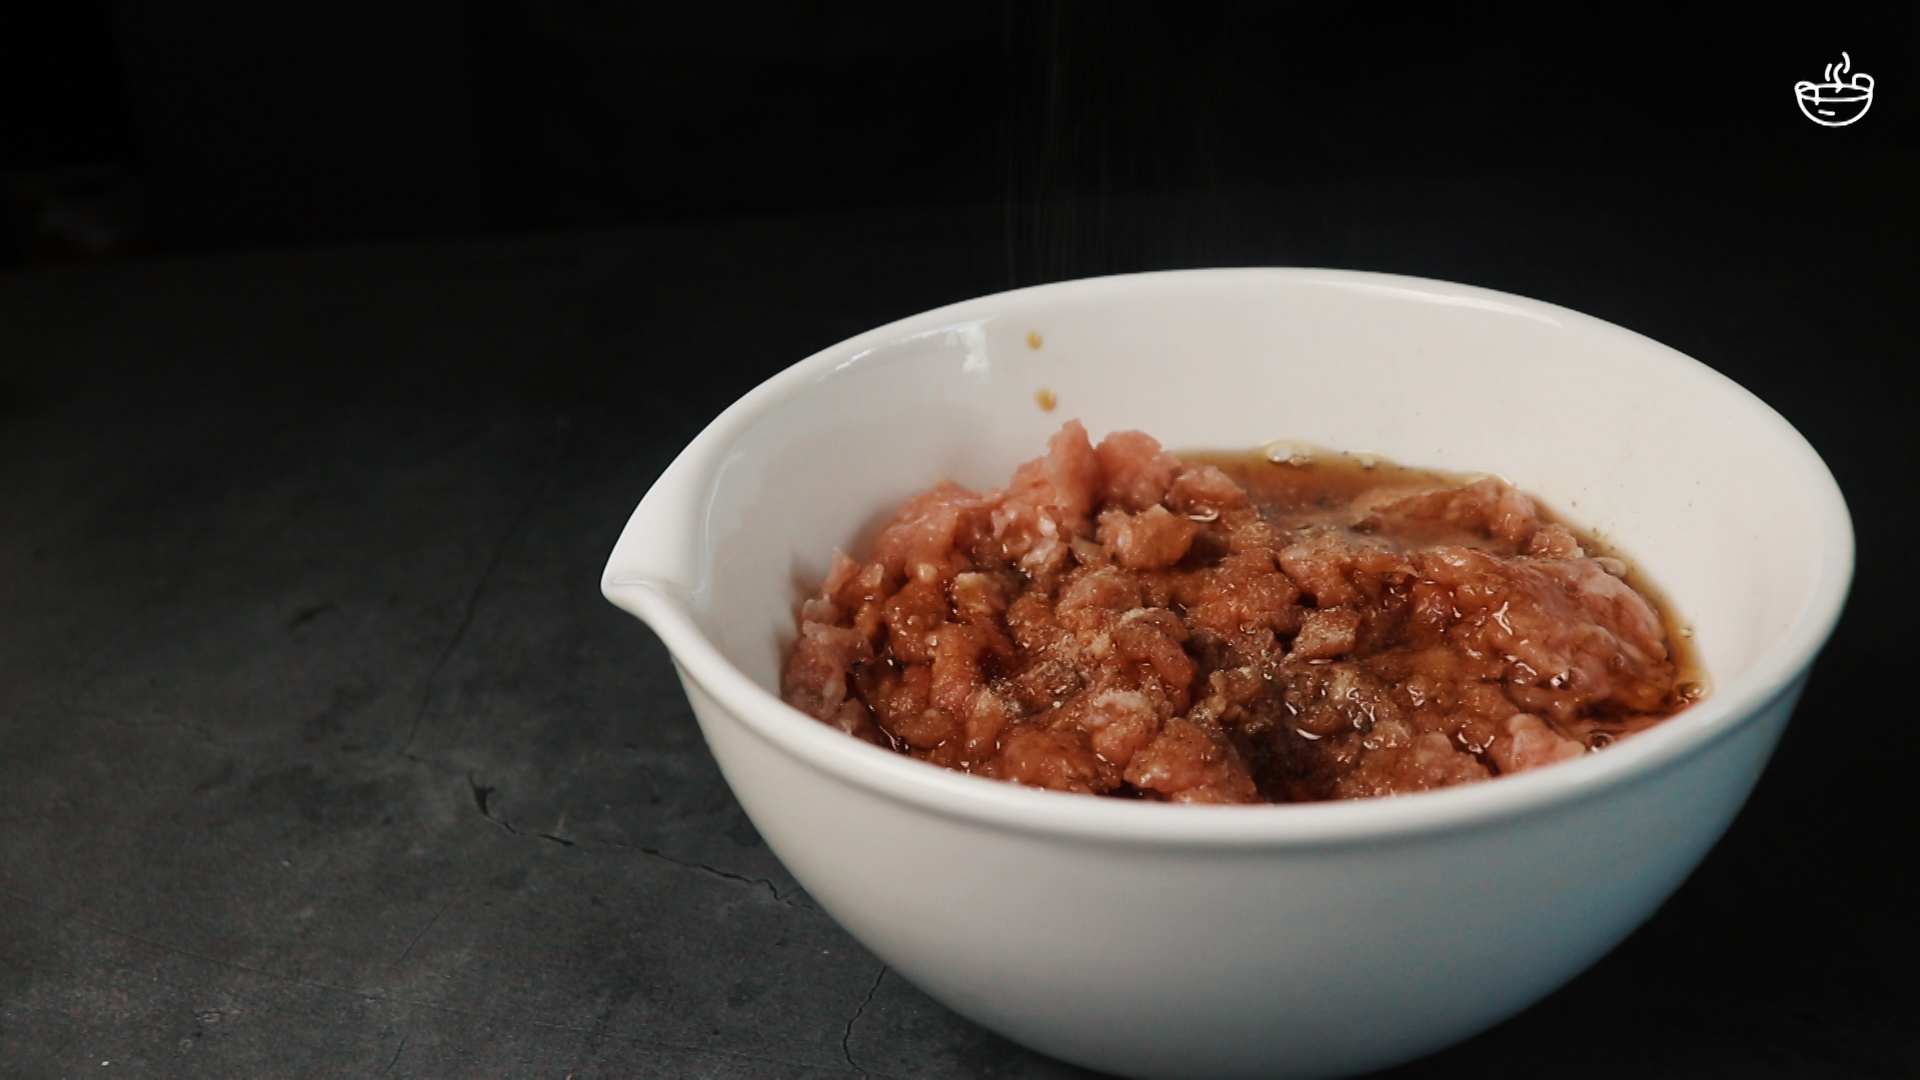
You can add any ingredients you want, for me I simply add minced pork as it’s one of the most hassle-free ingredients.
To the minced pork, I added 2 tbsp of light soya sauce, 2 tbsp of sesame oil and 1 tsp of white pepper powder.
You can add oyster sauce as well if you like. All this seasoning will go into the pot of congee so I don’t have to add more to the congee later.
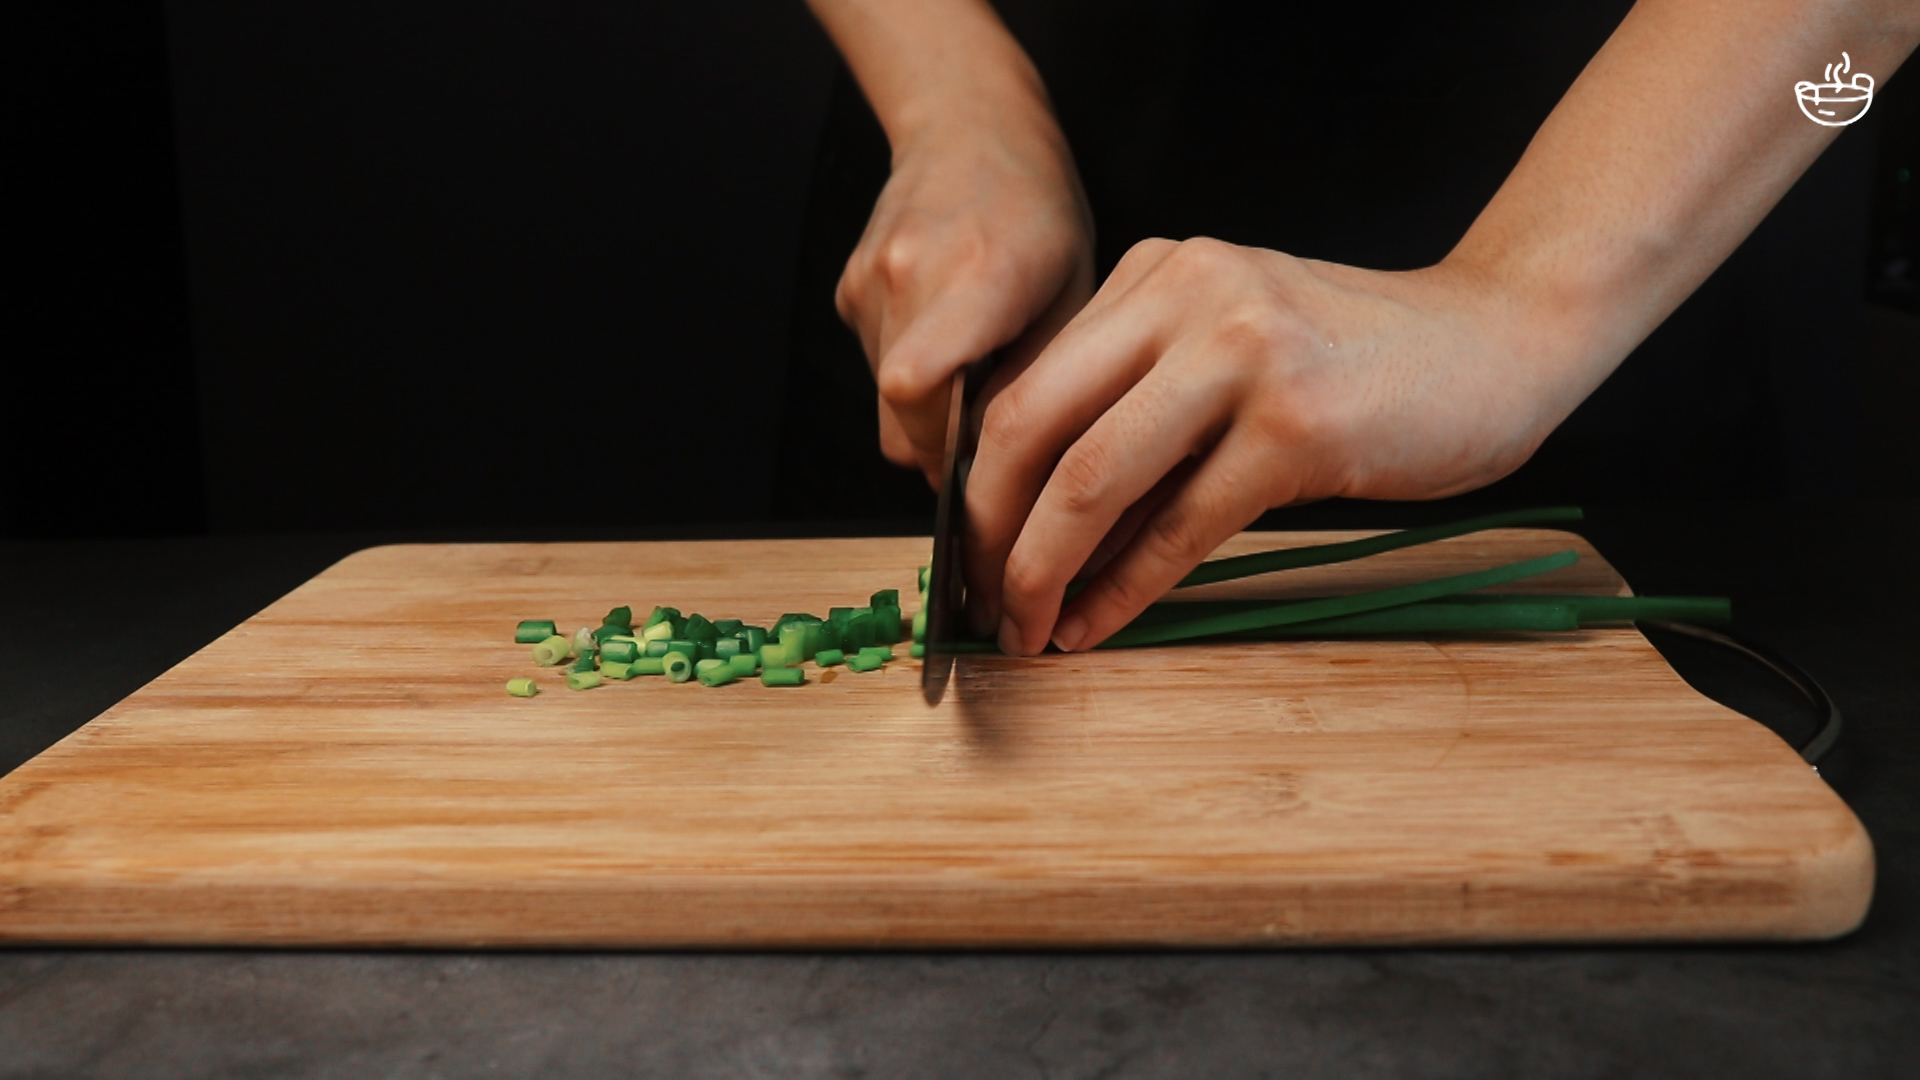
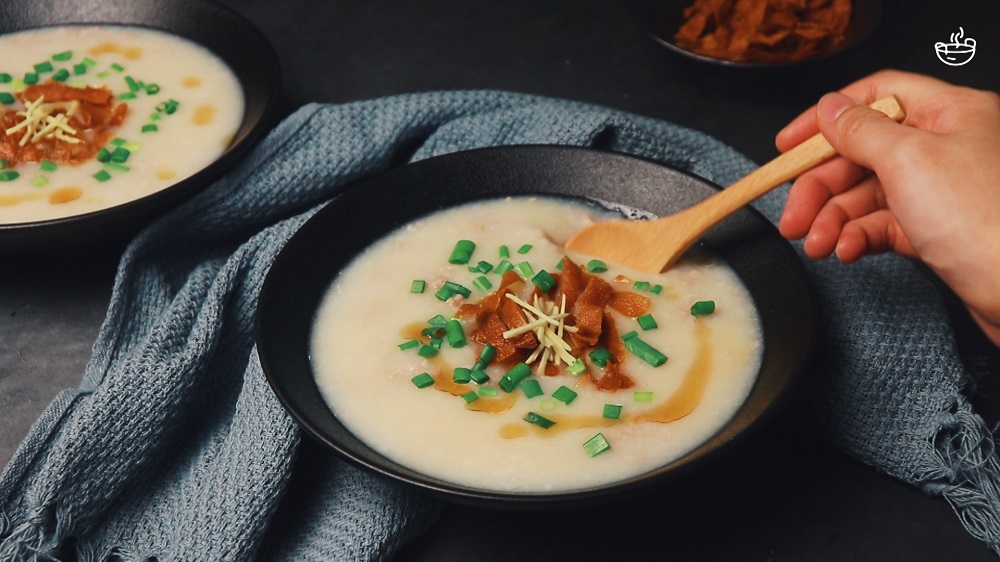
Chop some spring onions for garnish.
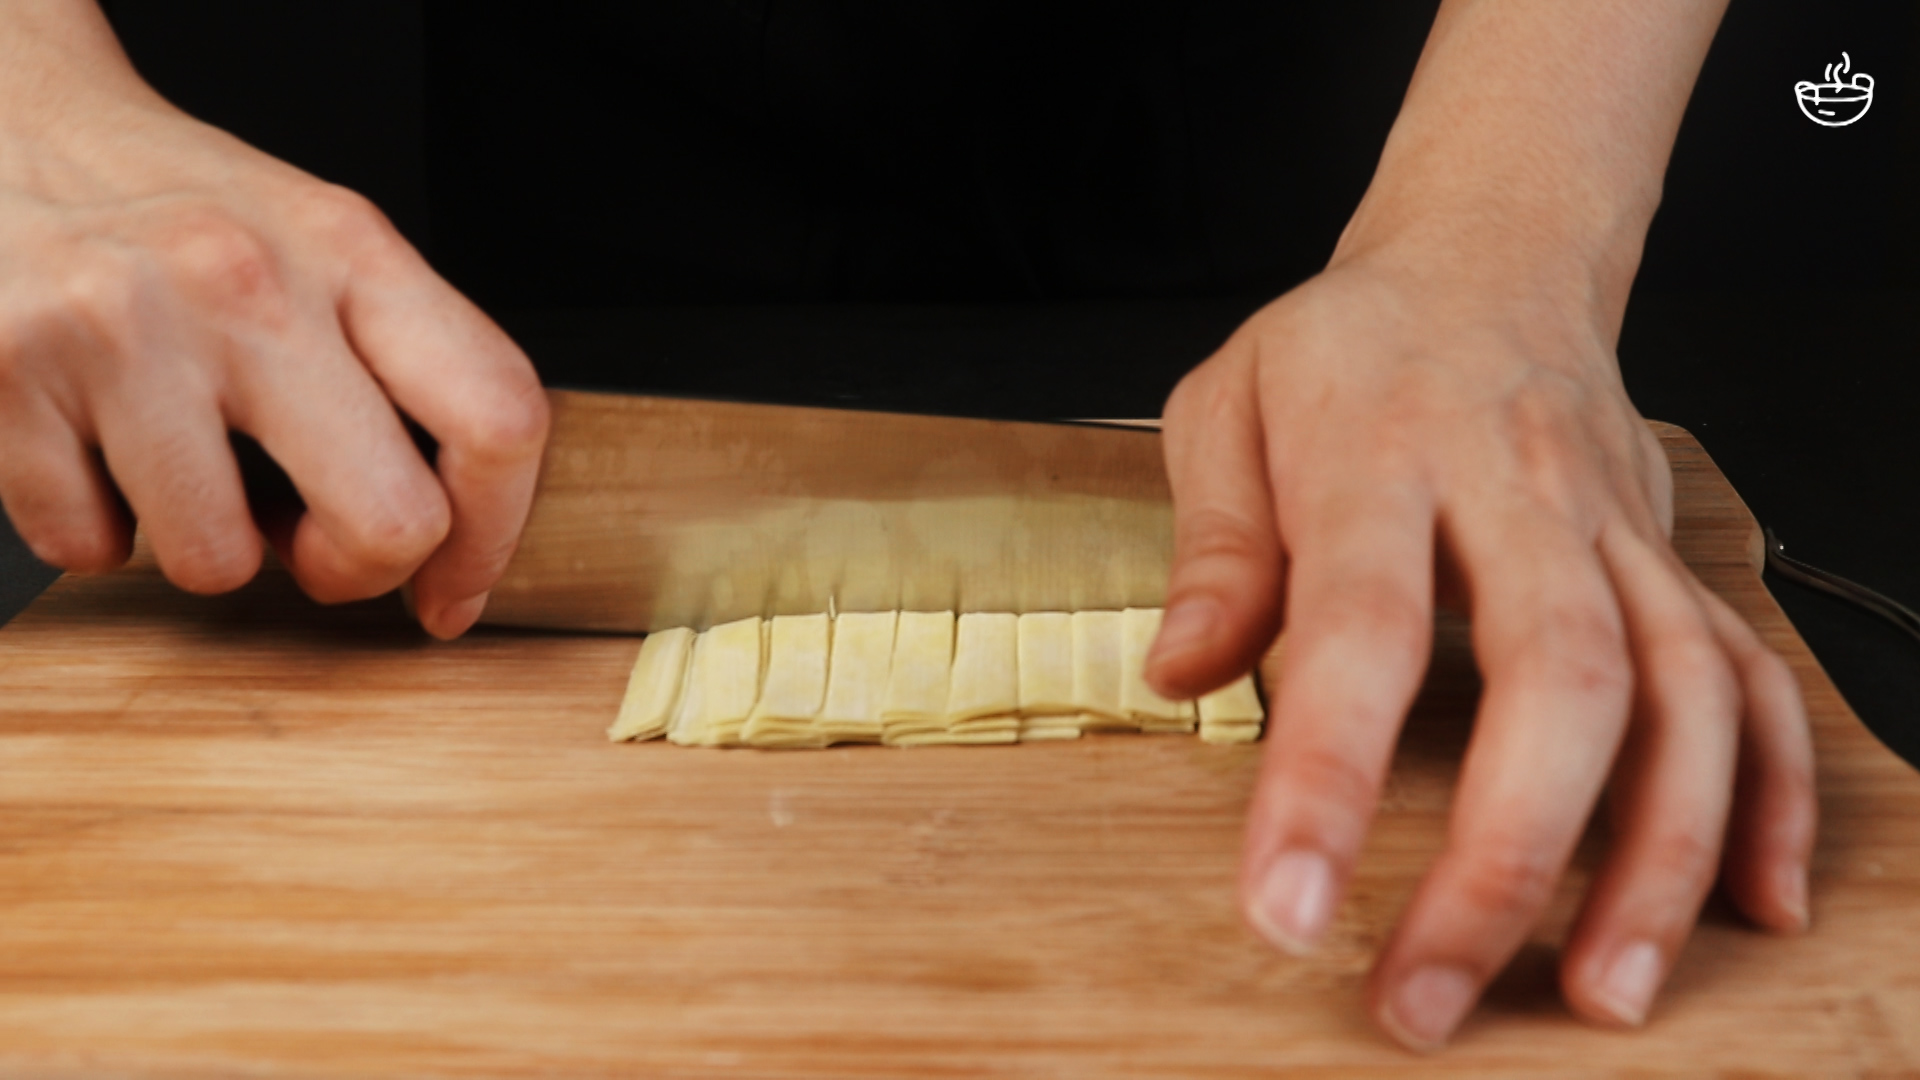
THIS is a must have! Humble-looking wanton wrapper that releases its full potential upon deep frying.
It turns into crispy, crunchy garnish that matches the congee very well as the slightly oily taste is alleviated by the mild congee.
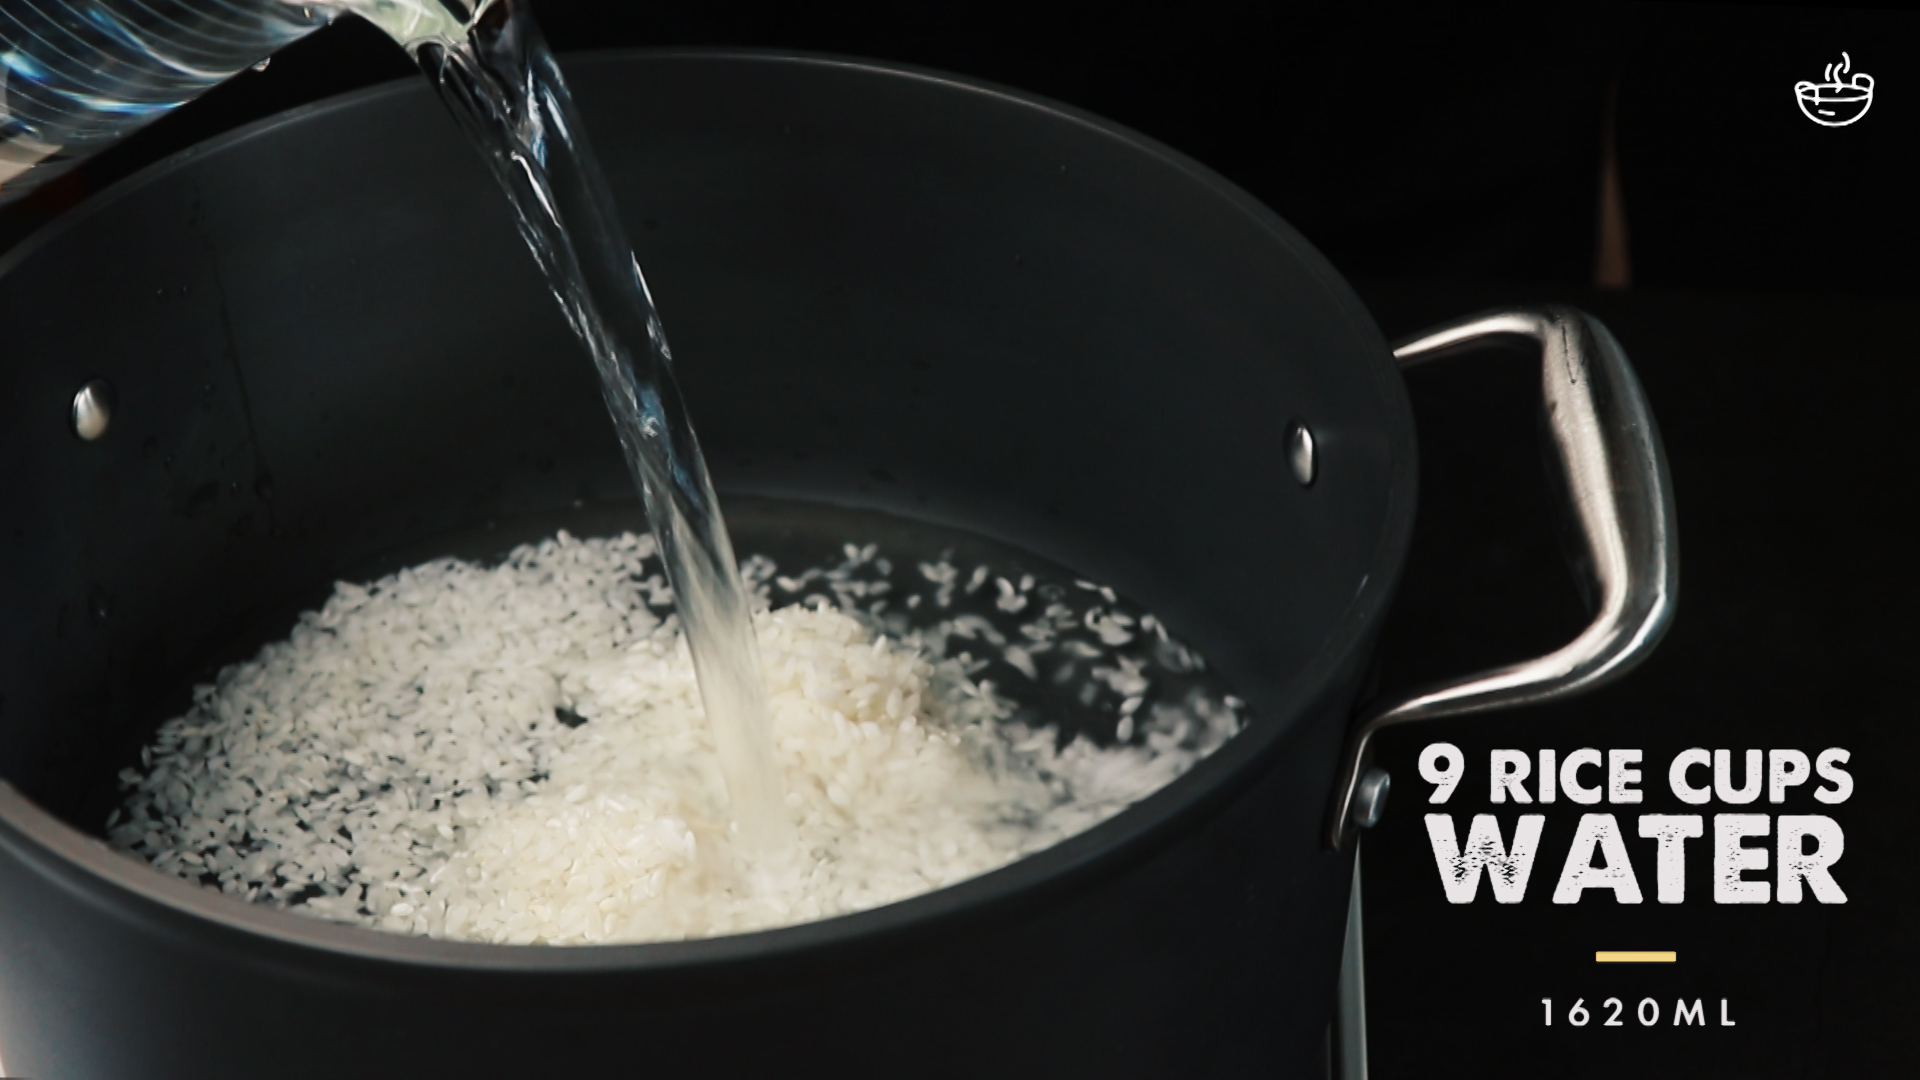
Add rice and water to the pot and bring to a boil over high heat.

While I don’t encourage the use of MSG, using chicken seasoning powder is the easiest way to achieve that rich umami flavour that is comparable to Crystal Jade’s congee.
You can also use chicken stock cubes or concentrated chicken stock. In fact, I believe most restaurants use MSG in their food to achieve a profound flavour in the most efficient and cost-effective way.
Which restaurant is going to spend hours boiling pots and pots of chicken stock for their congee?
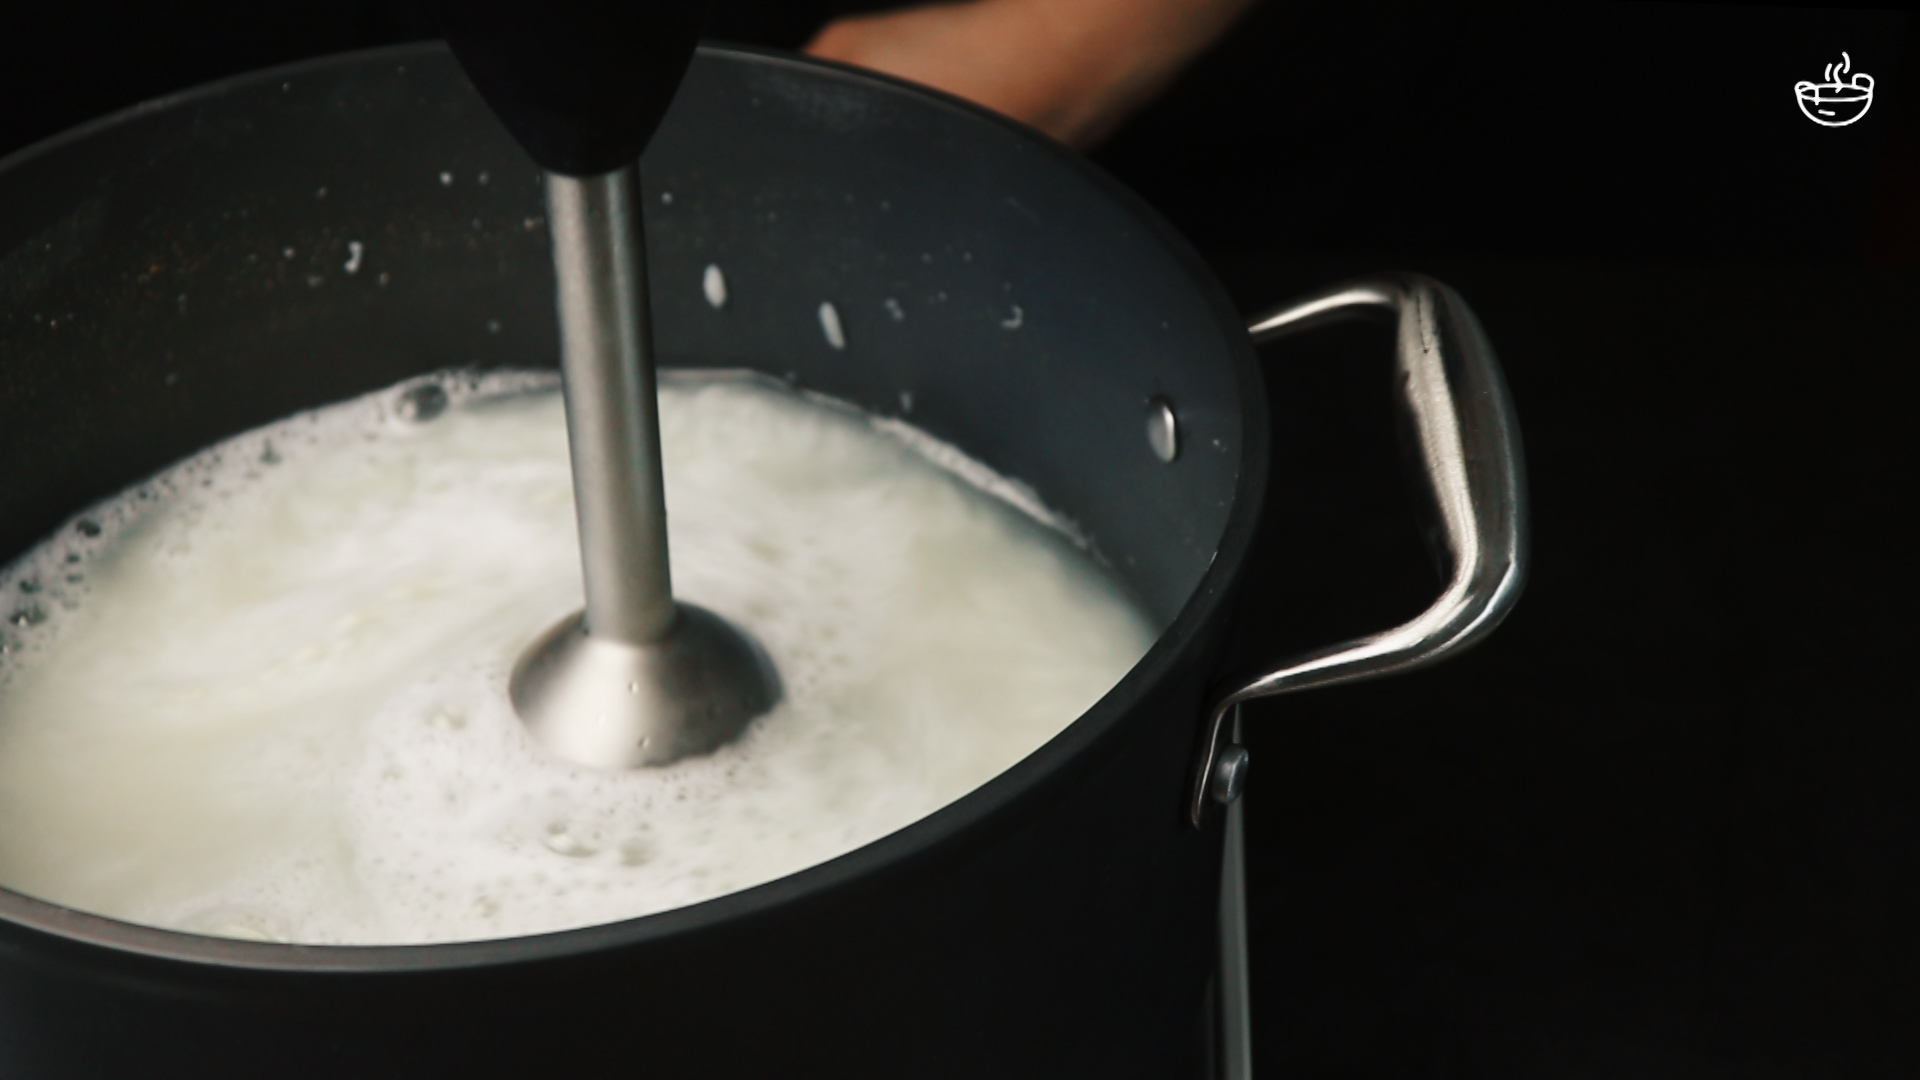
Boil the rice over high heat for 8-10 minutes, until the rice grains should be soft and cooked through. Turn off the heat and use an immersion blender to blend until the rice grains have all disintegrated.
Try not to over-blend otherwise the congee will become slightly gooey. A deep pot will be crucial for this step as the hot liquid can splatter easily while blending.
Also, make sure your pot has no non-stick coating otherwise it may get damaged by the blender.
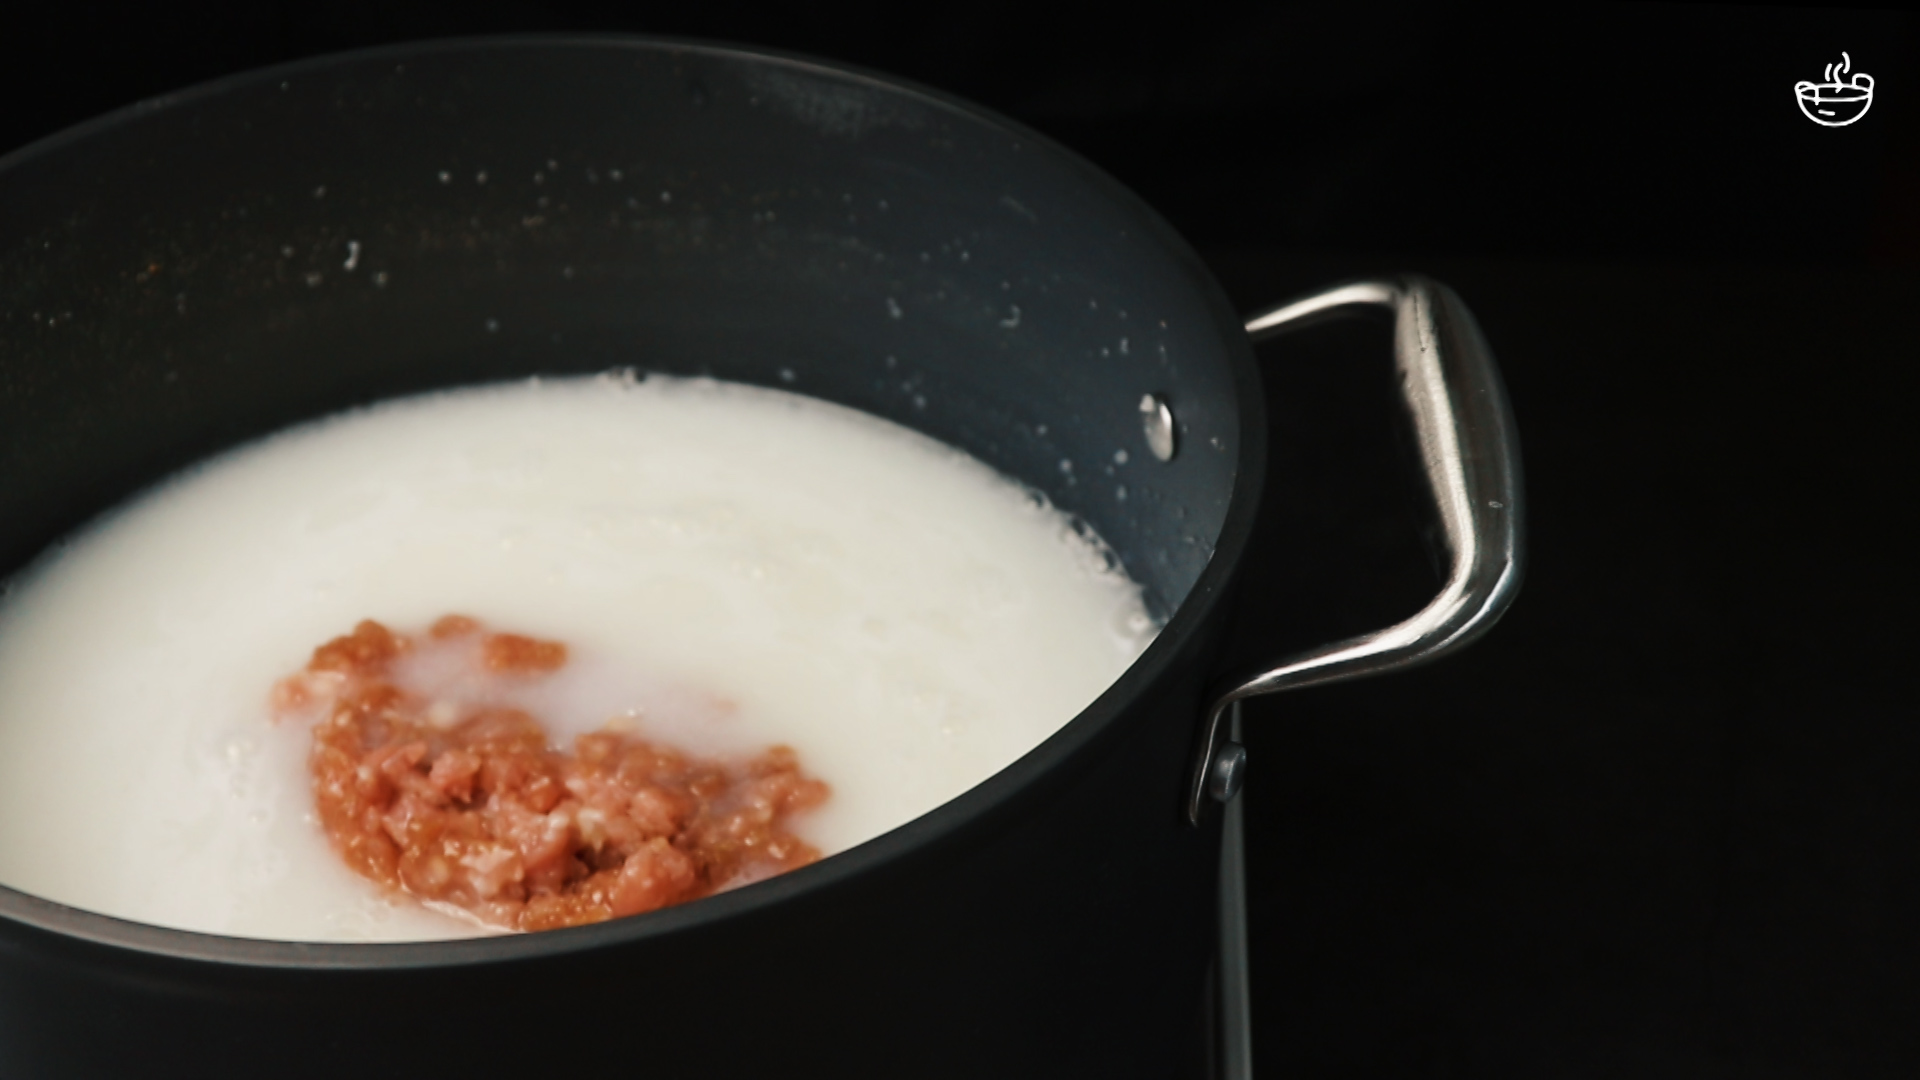
After blending,add your marinated minced pork & ginger and continue to cook the congee over medium-high heat for 2-3 minutes, stirring frequently.
If you think the congee is too thick, add some water to thin it down. If it’s too watery, cook a little longer to thicken it. Taste the congee to see if you need to add more seasoning.
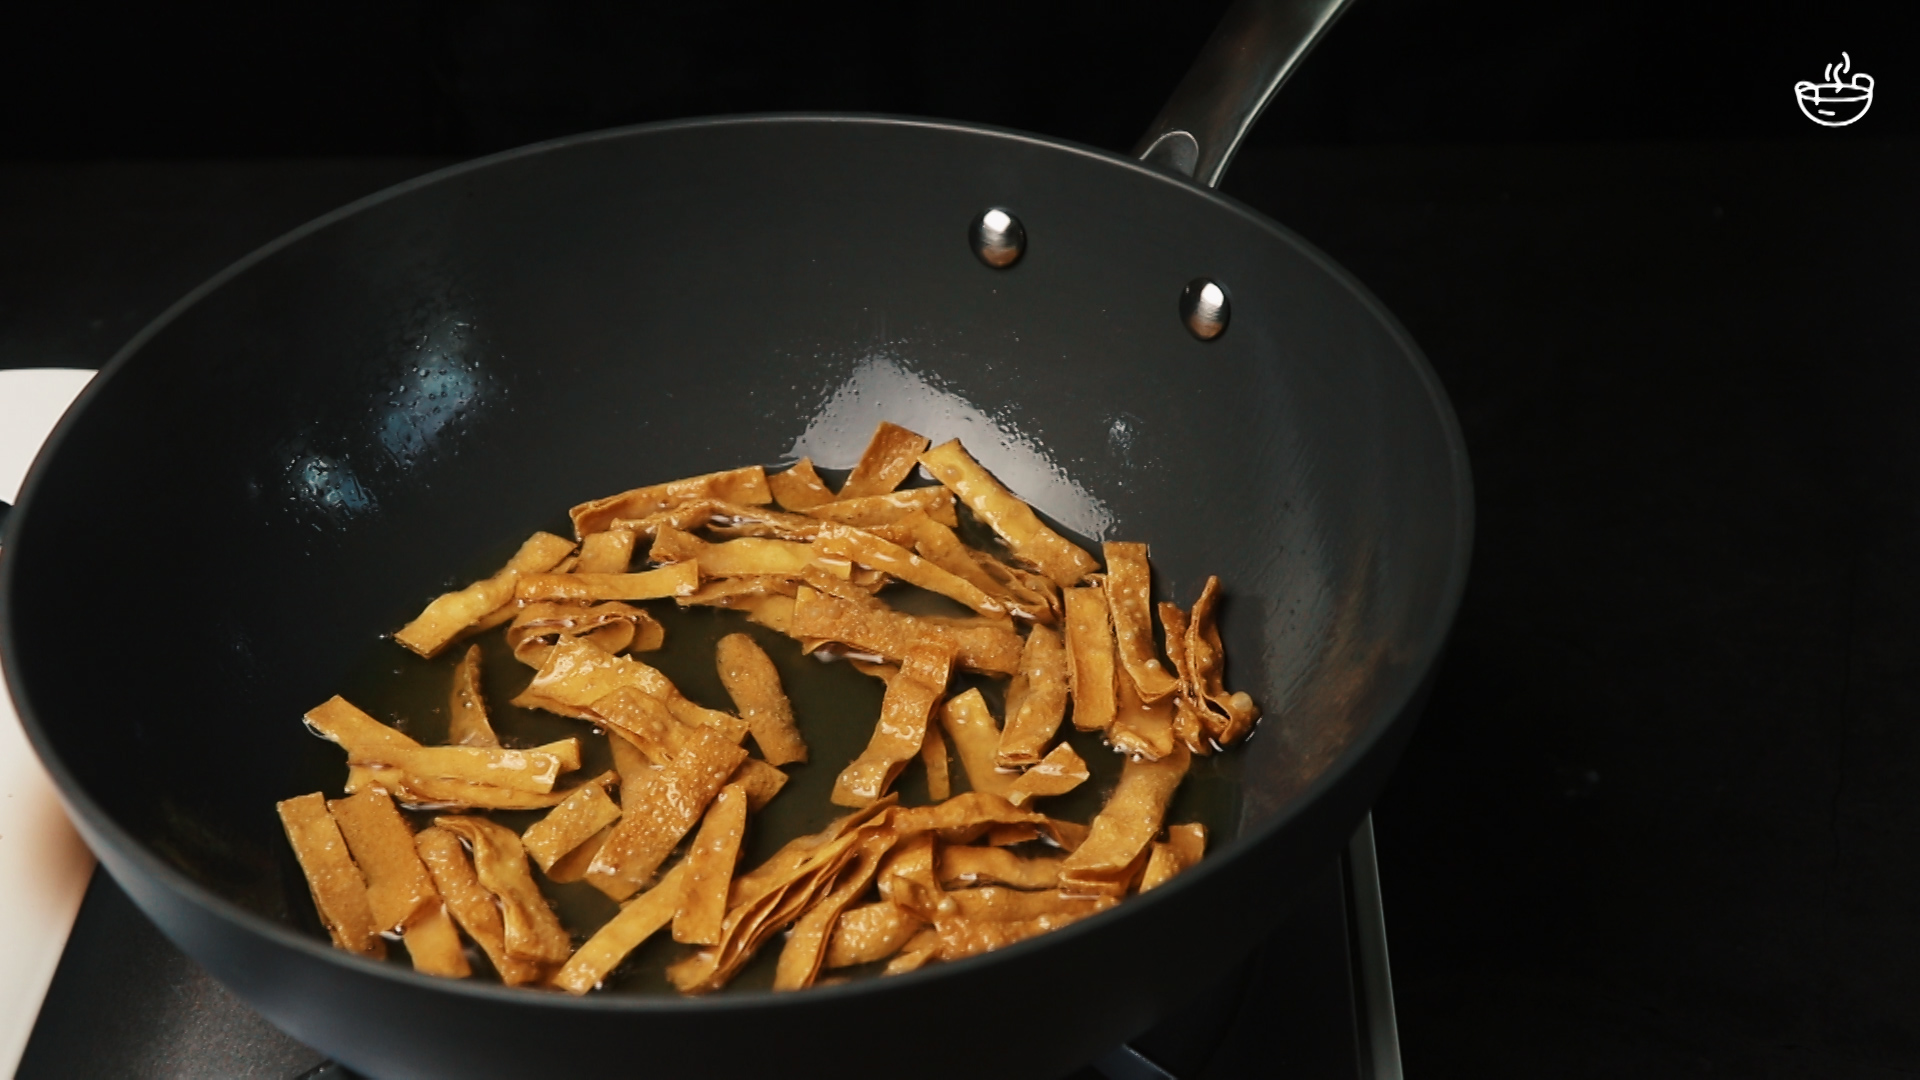
Meanwhile, deep fry the wanton wrappers till golden brown. You really got to add this!!
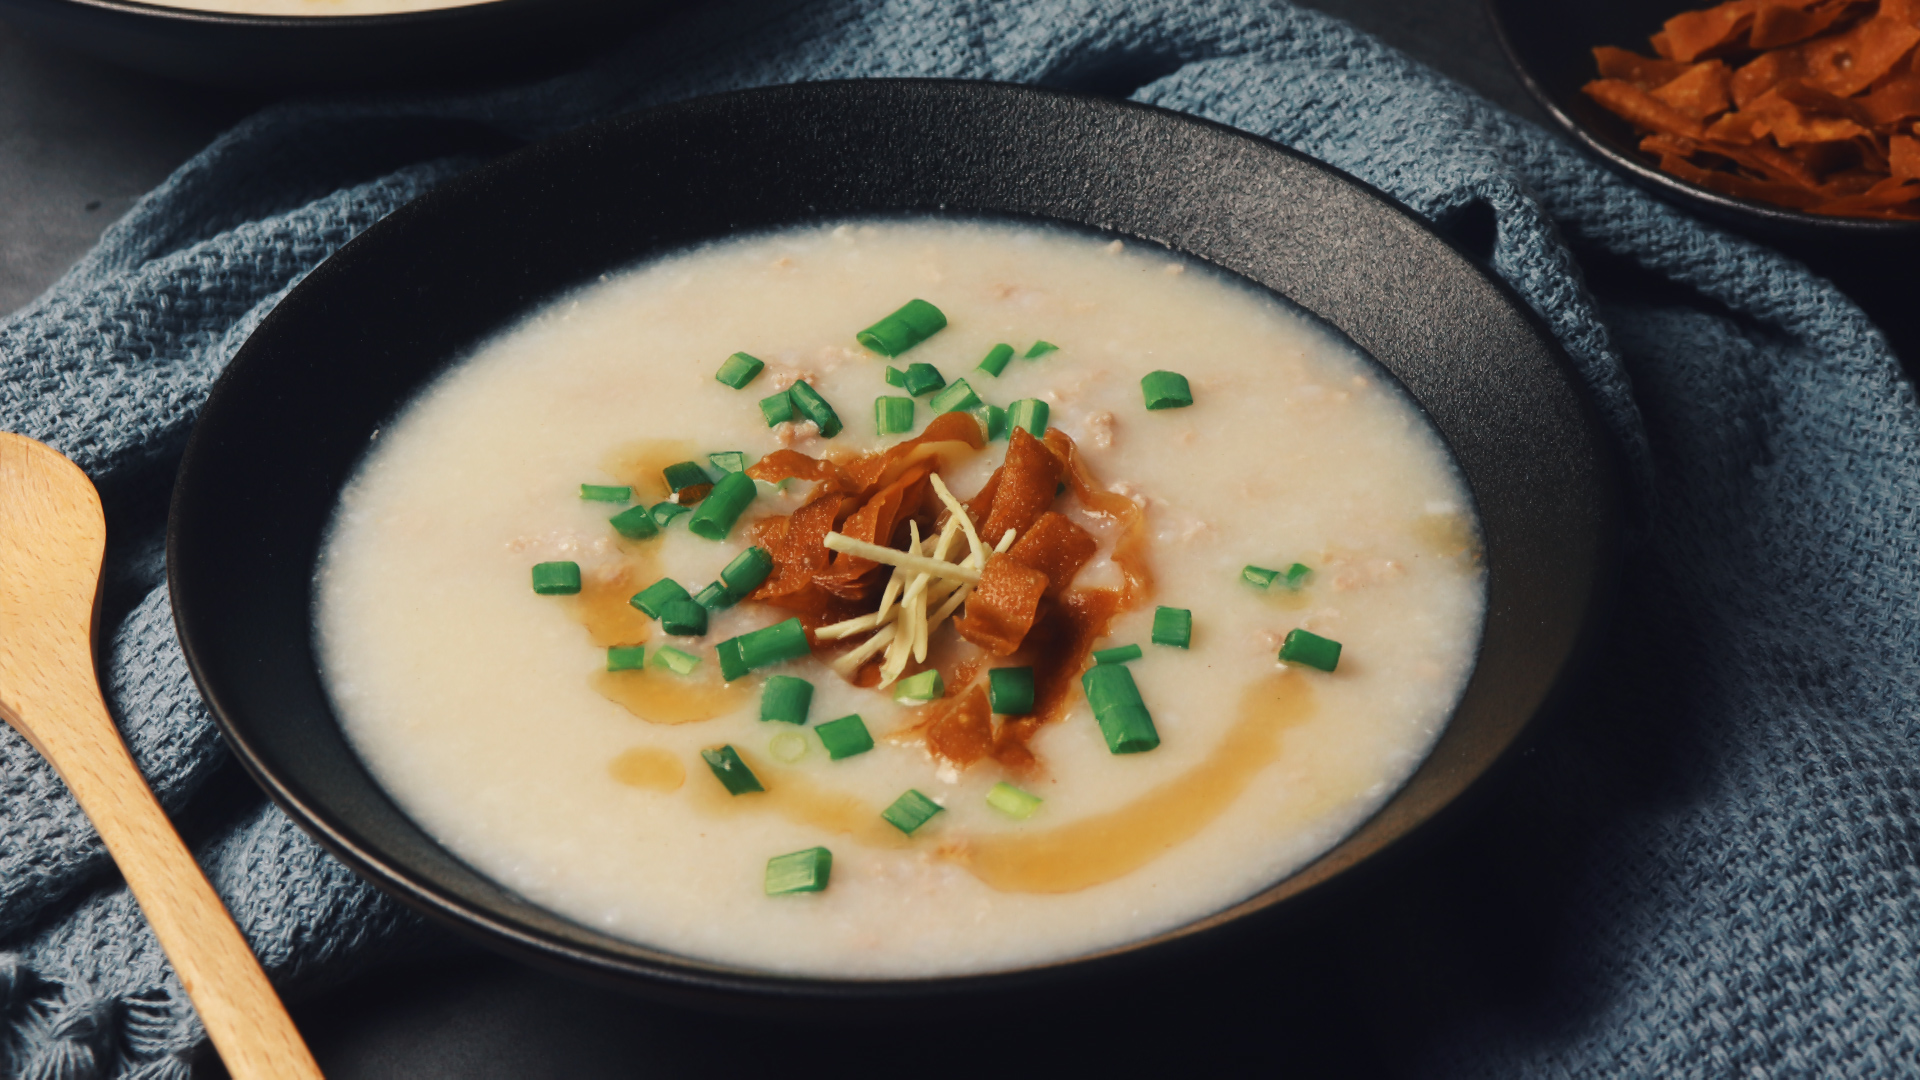
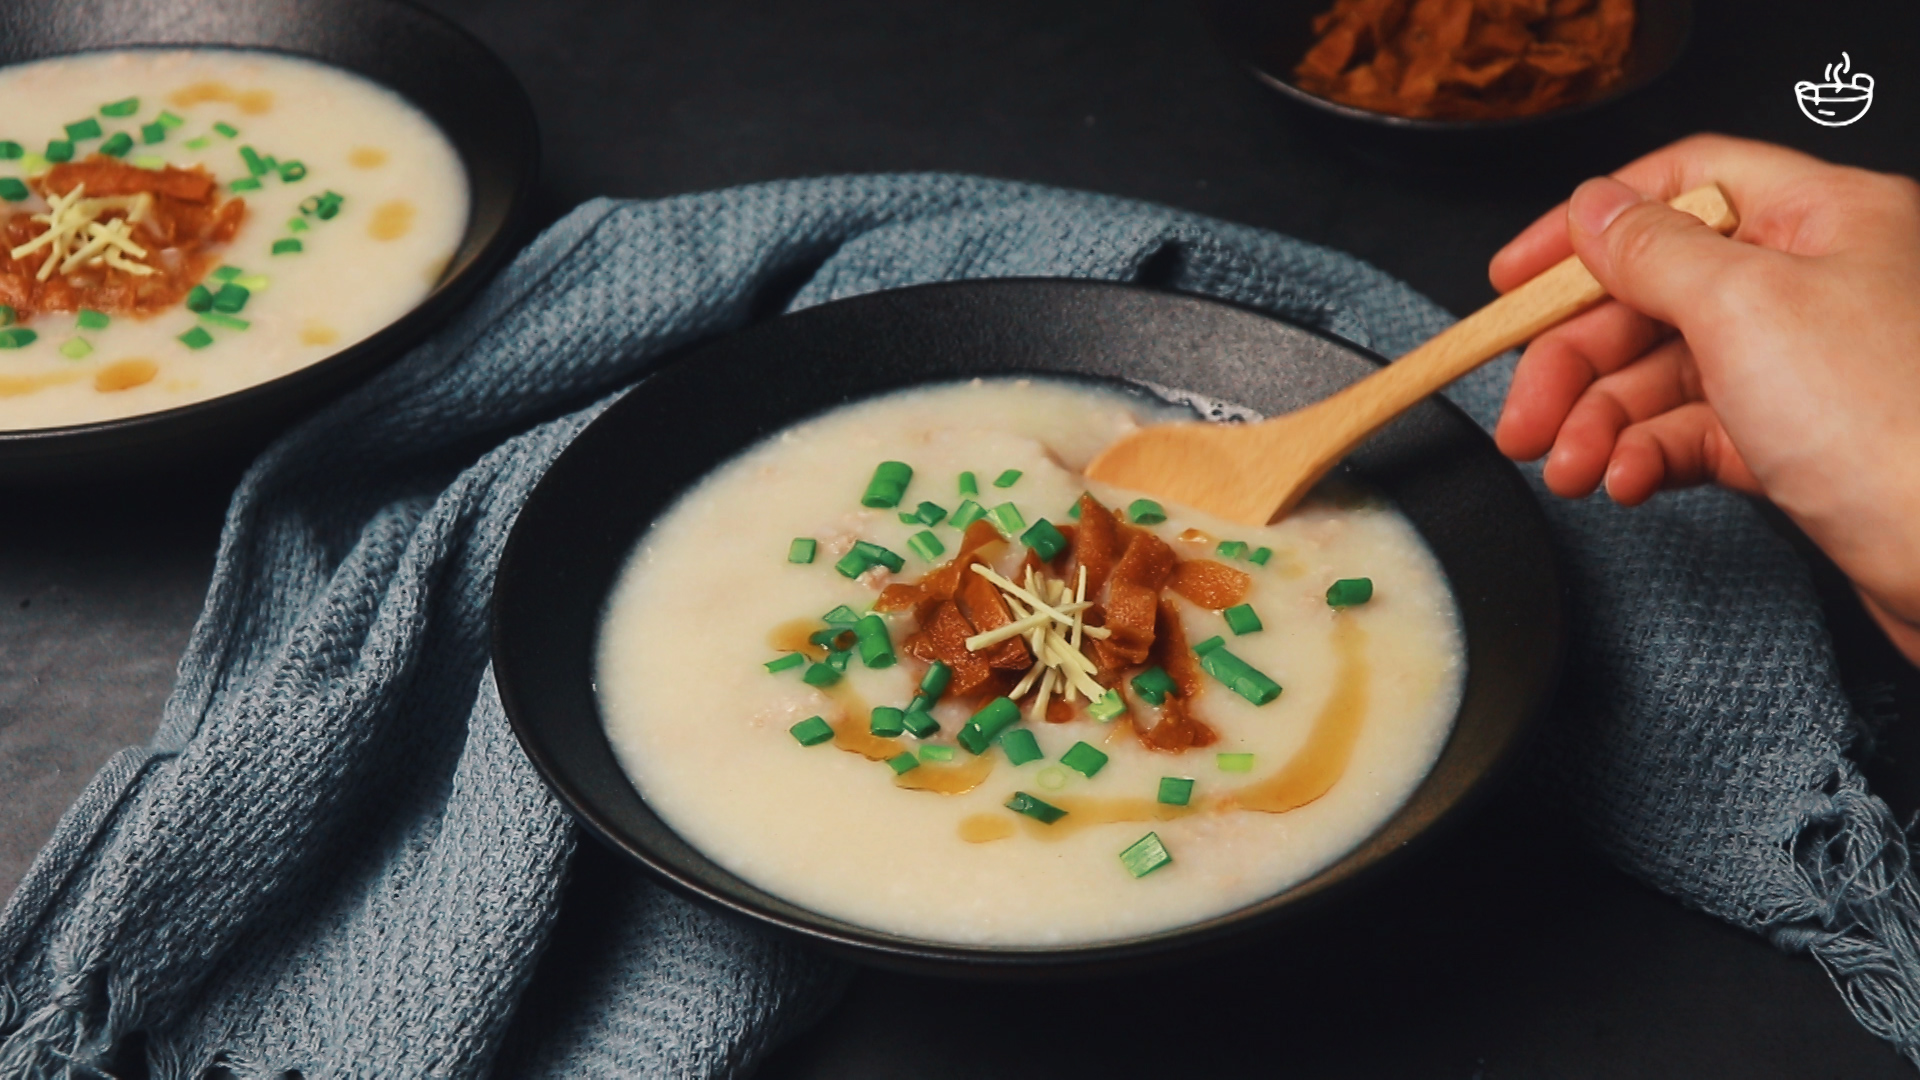
Garnish your congee with spring onions and crispy wanton wrapper. This is the silky, creamy consistency I have been searching for in my congee and I couldn’t believe how fast it took to achieve this.
I guarantee you’ll be asking for seconds! The immersion blender method will definitely be my go-to method for quick congee. Next time you want to get silky smooth congee within minutes, try this method!

15-minute Cantonese Congee
Ingredients
- ¾ cup japanese rice
- 1620 ml water
- 2 tbsp chicken powder
- 300 g minced pork
- 2 tbsp light soy sauce
- 2 tbsp sesame oil
- 1 tsp white pepper
- 5 stalks spring onion (chopped)
- 49 g wanton wrapper (short lengths)
Instructions
- Marinate minced pork with light soya sauce, sesame oil and pepper. Set aside.
- In a big pot, add rice and 1620ml (9 rice cups) of water, and bring to a boil over high heat.
- After 8-10 minutes, when rice grains are cooked through, turn off the heat. Use an immersion blender and blend till rice grains are no longer visible. Be careful at this stage as the hot liquid may splatter on you.
- Turn heat back on and add marinated pork & ginger. Cook over medium-high heat for 3-4 minutes, stirring frequently. If congee is too thick, add some water to thin it down. If congee is too watery, cook for a little longer.
- Meanwhile, deep fry wanton wrapper till golden brown. Remove and drain oil on kitchen towel. Garnish congee with spring onion and wanton wrapper.