This post may contain affiliate links. Please read our disclosure policy.
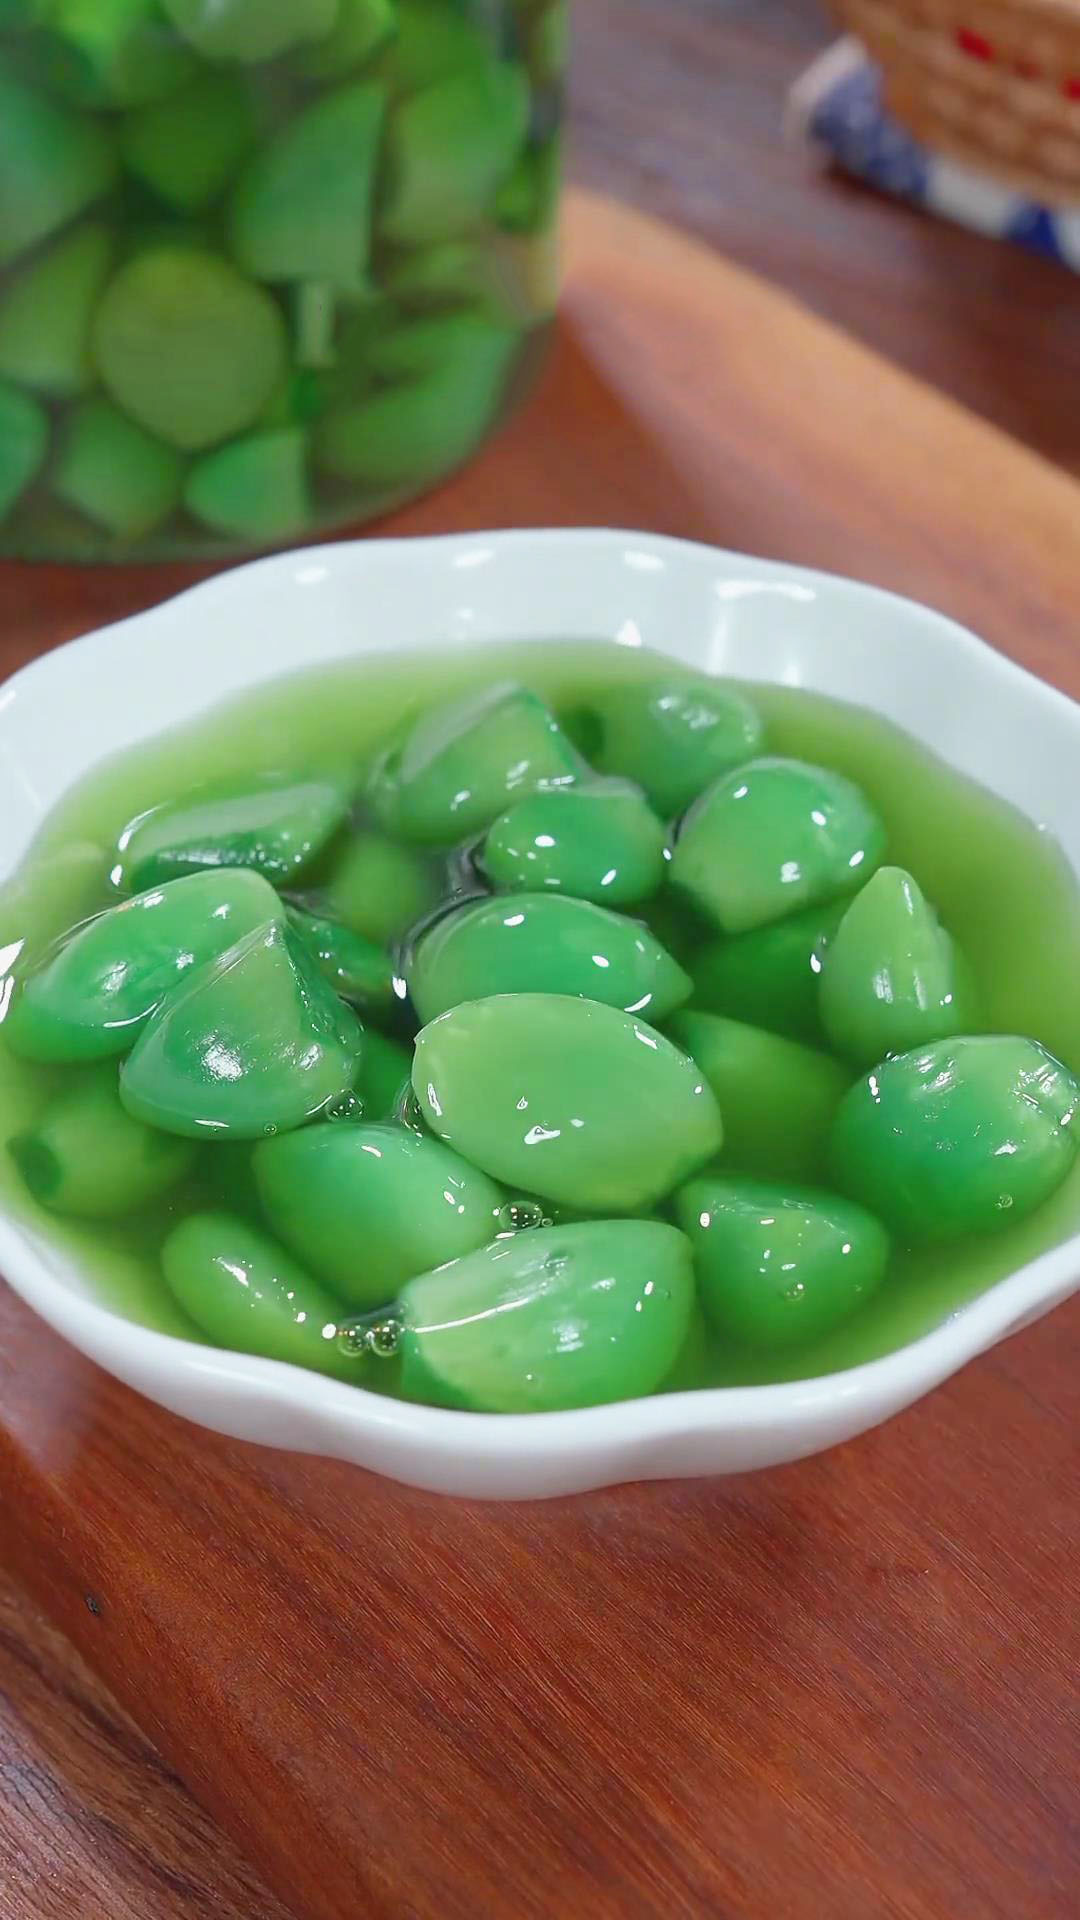
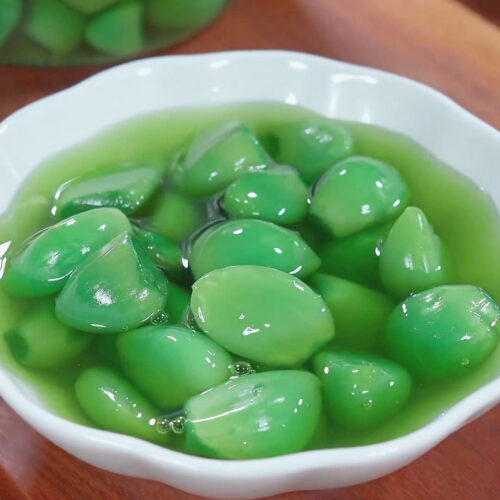
Laba garlic, a delectable and tangy delight, offers a burst of flavor that tantalizes the taste buds. Originating from China, this traditional dish is cherished for its simplicity and bold taste profile.
With just a few ingredients and a bit of patience, you can create your own batch of Laba garlic at home, boasting a delightful balance of tanginess and sweetness, crisp texture, and vibrant green hue, reminiscent of jade.
Why make Laba Garlic
Chinese people make Laba garlic as a cherished tradition deeply rooted in cultural significance and culinary delight.
Associated with the Laba Festival, marking the prelude to Chinese New Year, Laba garlic symbolizes prosperity and abundance.
Beyond its symbolic value, Laba garlic’s tangy flavor, achieved through a blend of garlic, sugar, salt, and vinegar, enhances various dishes and serves as a versatile condiment.
Historically, Laba garlic also served as a practical method of preserving garlic during winter, ensuring a year-round supply of this flavorful and auspicious delicacy. Thus, the making of Laba garlic embodies the intersection of cultural heritage and culinary expertise, celebrating the essence of Chinese culinary traditions.
Tips & Alternatives To Consider
- Garlic: Opting for purple-skinned garlic is my choice, as it offers a robust flavor, ample moisture, and rich nutrients, with stronger antioxidants and antibacterial properties compared to white-skinned garlic. However, using white-skinned garlic is acceptable if purple-skinned garlic is unavailable.
- Sugar: I specifically use white granulated sugar in this recipe and do not recommend using other types of sugar. White granulated sugar provides a subtle sweetness to the garlic, which helps to balance the tanginess of the vinegar and enhances the overall flavor profile of the dish.
- Rice vinegar: Rice vinegar adds a mild acidity that enhances the flavor and preserves Laba garlic
I’ve compiled some key tips based on my experience. If you want to successfully make Laba garlic, pay attention to these:
- Choose Quality Garlic: Select fresh and firm purple-skinned garlic cloves for the best flavor and texture. However, as mentioned earlier, using white-skinned garlic is also acceptable if purple-skinned garlic is unavailable.
- Proper Preparation: Peel and trim the garlic cloves thoroughly to remove any blemishes or dirt, ensuring even fermentation. Additionally, trim off both ends of the garlic cloves, allowing them to better absorb the sauce. This quickens the reaction process, facilitating the garlic’s swift color change, an essential step in the recipe.
- Use Quality Vinegar: Opt for high-quality rice vinegar or white vinegar to preserve the garlic effectively and add a tangy flavor.
- Avoid Iron Containers: When heating the vinegar, use non-reactive containers like stainless steel or glass to prevent any unwanted reactions with the garlic.
- Ensure Submersion: Make sure that all garlic cloves are fully submerged in the vinegar to prevent spoilage and ensure even fermentation.
- Allow Sufficient Fermentation Time: Let the garlic ferment for at least two days in a warm environment to develop its full flavor.
- Store Properly: Once fermented, store Laba garlic in a clean, airtight container in the refrigerator to prolong its shelf life and maintain freshness.
Ingredients:
- 500g purple-skinned garlic
- 40g white sugar
- 10g salt
- 500ml rice vinegar or white vinegar
Instructions:
- Prepare the Garlic:


Start by gathering 500g of purple-skinned garlic. Peel and trim the cloves, ensuring they are clean and free from any blemishes. This initial step is crucial as it facilitates quick fermentation and ensures optimal flavor development.
- Season the Garlic:


After peeling the garlic cloves, place them in a bowl, then add 40g of white sugar and 10g of salt, gently rubbing them for about two minutes to allow the garlic to absorb the flavors of the sugar and salt, thereby enhancing its taste.
- Transfer to a Jar:

Once the garlic is adequately seasoned, transfer it to a clean and sterilized jar. Choose a jar size that accommodates the garlic comfortably, leaving some space at the top.
- Heat the Vinegar:

In a pot, pour 500ml of rice vinegar or white vinegar. It’s essential to avoid using an iron pot, as it can react with the vinegar. Heat the vinegar on the stove until it reaches a gentle simmer. Do not allow it to boil or cool down.
- Pour the Vinegar:

Carefully pour the heated vinegar directly into the jar containing the seasoned garlic. Ensure that all the garlic cloves are fully submerged in the vinegar. The hot vinegar will help preserve the garlic and infuse it with its tangy flavor.
- Fermentation:

Seal the jar tightly with a lid and place it in a warm area or on a heating pad. Allow the garlic to ferment for at least two days, allowing the flavors to meld and develop. During this time, check the jar occasionally to ensure that the garlic remains submerged in the vinegar.
- Enjoy:
After the fermentation period, your Laba garlic is ready to be enjoyed! Serve it as a flavorful condiment alongside your favorite dishes or incorporate it into salads, marinades, and sauces for an extra kick of flavor.


How to Make Laba Garlic
Ingredients
- 500 g purple-skinned garlic
- 40 g white sugar
- 10 g salt
- 500 ml rice vinegar or white vinegar
Instructions
Prepare the Garlic:
- Start by gathering 500g of purple-skinned garlic. Peel and trim the cloves, ensuring they are clean and free from any blemishes. This initial step is crucial as it facilitates quick fermentation and ensures optimal flavor development.
Season the Garlic:
- After peeling the garlic cloves, place them in a bowl, then add 40g of white sugar and 10g of salt, gently rubbing them for about two minutes to allow the garlic to absorb the flavors of the sugar and salt, thereby enhancing its taste.
Transfer to a Jar:
- Once the garlic is adequately seasoned, transfer it to a clean and sterilized jar. Choose a jar size that accommodates the garlic comfortably, leaving some space at the top.
Heat the Vinegar:
- In a pot, pour 500ml of rice vinegar or white vinegar. It's essential to avoid using an iron pot, as it can react with the vinegar. Heat the vinegar on the stove until it reaches a gentle simmer. Do not allow it to boil or cool down.
Pour the Vinegar:
- Carefully pour the heated vinegar directly into the jar containing the seasoned garlic. Ensure that all the garlic cloves are fully submerged in the vinegar. The hot vinegar will help preserve the garlic and infuse it with its tangy flavor.
Fermentation:
- Seal the jar tightly with a lid and place it in a warm area or on a heating pad. Allow the garlic to ferment for at least two days, allowing the flavors to meld and develop. During this time, check the jar occasionally to ensure that the garlic remains submerged in the vinegar.

Hi, I tried your recipe and the garlic did turn a little green and then turned back to white. Is that suppose to happen? Not sure if I did something wrong or what happened. Please help. Thank you.
Hi Celia,
How many days did you wait? Sometimes a few more days work.
What is the best way to store this after fermentation? Can you seal and can this recipe? Thank you for sharing
Hi…how many days more for it to turn green?it’s been two days since I followed the recipe and some of the garlic did turn light green and some are white…