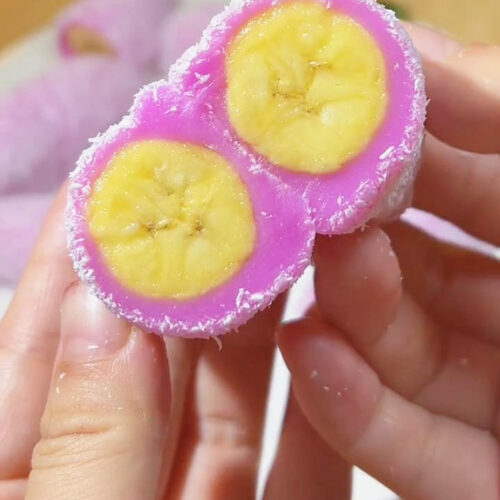
If you’re craving a delightful and unique dessert, look no further than this Banana Mochi recipe. Combining the sweetness of ripe bananas with the chewy texture of glutinous rice flour, these delectable treats are sure to please your taste buds. Follow my simple steps to create your own batch of Banana Mochi at home.
What is banana mochi
Mochi is a traditional rice cake in Japan that is loved for its round, chewy, and sticky consistency. It is enjoyed as a dessert for any occasion and season. However, this is a common dessert served during special seasons like spring and celebrations like Japanese New Year, Children’s Day, and Girls’ Day. 
In this banana mochi recipe, I encase the banana within the soft, pillowy mochi dough, creating a delicious treat that combines the sweetness of ripe bananas with the delightful chewiness of mochi. Similar to my strawberry mochi, this treat promises a delicious indulgence for fruit lovers.
Ingredient Substitutes And Recipe Techniques
As you may recall, I’ve shared numerous mochi recipes on Kitchen Misadventures, including Mango Mochi, Peanut Mochi, Strawberry Mochi, Mochi With Red Bean Paste, and Taro Mochi.
Here are some invaluable tips and tricks to enhance your mochi-making experience.
- Glutinous rice flour: Glutinous rice flour plays a crucial role in giving mochi its signature sticky and chewy texture. It’s responsible for that delightful sensation where the mochi sticks to your teeth and stretches as you bite into it. Despite its name, “glutinous,” which refers to its sticky properties when cooked, it’s actually gluten-free. Believe me, investing in this special flour is worthwhile! Apart from making mochi, there are numerous other recipes on Kitchen Misadventures where you can use glutinous rice flour. Whether it’s for making Nian Gao, Tang Yuan, Ham Sui Gok (Fried Glutinous Rice Dumplings), or Festive Snow Skin Mooncakes, having some leftover glutinous rice flour opens up a world of culinary possibilities!
- Sugar: Use white sugar if you want to achieve a white mochi base. If you don’t mind a hint of brown, you can also use brown sugar, coconut sugar, cane sugar, or muscovado sugar.
- Cornstarch: Glutinous rice flour and cornstarch work hand in hand to create the best texture. Cornstarch helps add more thickness and chewiness to the mochi dough. You can substitute this with the following alternatives:
- All-Purpose Flour (1:1 ratio)
- Arrowroot Powder (1:1 ratio)
- Tapioca Starch/Flour (1:1 ratio)
- Potato Starch (1:1 ratio)
- Rice Flour (1:1 ratio)
- Milk: In order to make the dough creamy and rich in flavor and texture, I add a small amount of milk. You can use regular milk or any dairy-free milk like soy, oat, or almond. For a stronger coconut taste, I suggest coconut milk or coconut cream with water. Don’t have milk? That’s okay since you can simply use water to liquify the dough. However, it may not be as creamy and rich as when milk is used.
- Dragon fruit juice: Dragon fruit juice adds a vibrant pink hue to the dough, enhancing the visual appeal of the banana mochi. However, it is optional, and you can omit it if you do not have it available.
Cooking Methods: There are primarily three methods to cook mochi dough.
- Pan-frying method, as demonstrated in the Chocolate Mochi Recipe and Strawberry Mochi Recipe.
- Steam method, as seen in my Peanut Mochirecipe and Taro Mochi recipe.
- Microwave method, as shown in the Matcha Mochi recipe.
How long does banana mochi last?
Fruit-filled mochi can be refrigerated for up to two days. Seal them in airtight bags to maintain freshness!
Ingredients:
- 130g glutinous rice flour
- 40g cornstarch
- 30g granulated sugar
- 160g milk
- 8g vegetable oil (peanut oil recommended) or 10g butter
- 10g dragon fruit juice(optional)
- 8 Small bananas
- coconut flakes for coating
Instructions:
In a mixing bowl, combine the glutinous rice flour, cornstarch, granulated sugar, and milk. Stir until the mixture is smooth and well combined.

Pour the mixture into a shallow dish and cover it before steaming. If you prefer, you can use plastic wrap to cover the container. Make sure to poke a few holes in the plastic wrap with a toothpick, similar to what was done in the Mango Mochi recipe. Steam the mixture for about 20 minutes until it becomes firm and translucent.
After steaming, add the vegetable oil (or butter) and dragon fruit juice to the mixture. Knead the mixture until the oil is absorbed, then continue to knead until the color is uniform and the texture is smooth. Continue to stretch and pull the mixture until it reaches a pliable consistency and is evenly colored throughout.


Take a small piece of the dough and pinch the edges thinly to create a wrapper.
Peel the small bananas and place each one into a piece of the glutinous rice dough. Seal the edges of the dough and shape them neatly around the banana. If you only have large bananas, slice them into pieces of appropriate size before wrapping them in the dough.

Prepare a pack of coconut flakes in advance. Carefully coat each Banana Mochi with a generous layer of coconut flakes, ensuring they adhere to the surface for added texture and flavor.
Once coated, your Banana Mochi is ready to serve! Enjoy these delicious treats as a snack or dessert, and share them with family and friends for a delightful culinary experience.
Tip: You can also experiment with different types of fruit fillings or coatings for your Banana Mochi to create unique flavor combinations. Let your creativity shine and enjoy the delicious results!
Banana Mochi Recipe: A Delicious Treat for Any Occasion
Ingredients
- 130 g glutinous rice flour
- 40 g cornstarch
- 30 g granulated sugar
- 160 g milk
- 8 g vegetable oil peanut oil recommended or 10g butter
- 10 g dragon fruit juice optional
- 8 Small bananas
- coconut flakes for coating
Instructions
- In a mixing bowl, combine the glutinous rice flour, cornstarch, granulated sugar, and milk. Stir until the mixture is smooth and well combined.
- Pour the mixture into a shallow dish and cover it before steaming. If you prefer, you can use plastic wrap to cover the container. Make sure to poke a few holes in the plastic wrap with a toothpick, similar to what was done in the Mango Mochi recipe. Steam the mixture for about 20 minutes until it becomes firm and translucent.
- After steaming, add the vegetable oil (or butter) and dragon fruit juice to the mixture. Knead the mixture until the oil is absorbed, then continue to knead until the color is uniform and the texture is smooth. Continue to stretch and pull the mixture until it reaches a pliable consistency and is evenly colored throughout.
- Take a small piece of the dough and pinch the edges thinly to create a wrapper.
- Peel the small bananas and place each one into a piece of the glutinous rice dough. Seal the edges of the dough and shape them neatly around the banana. If you only have large bananas, slice them into pieces of appropriate size before wrapping them in the dough.
- Prepare a pack of coconut flakes in advance. Carefully coat each Banana Mochi with a generous layer of coconut flakes, ensuring they adhere to the surface for added texture and flavor.