The Mid-autumn festival is a celebration worth waiting for! What better way to celebrate this joyous occasion than by making your very own delicious snow skin mooncakes? Snow skin mooncakes are irresistibly soft, bursting with a variety of delectable fillings! This no-bake recipe is uncomplicated and can make about 10 pieces of snow skin mooncakes.
What Are Mooncakes?
First, what are Chinese mooncakes? Mooncakes are a popular Chinese snack eaten every mid-autumn festival, which usually falls on the 15th day of the 8th month of the Chinese lunisolar calendar. At this time, it is always celebrated on a full moon day.
Thus, eating mooncakes resembling the shape of the moon has been a tradition. It is made into various shapes, sizes, and flavors. Mooncakes are soft and shiny and typically stuffed with sweet or savory fillings.
What Are Snow Skin Mooncakes?
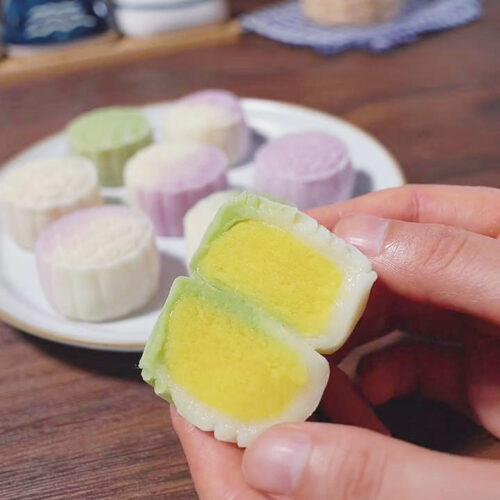
A trendy version of the traditional mooncake is the snow skin mooncake. It is chewy and sticky like mochi and white like snow. Today, snow skin mooncakes are colored in a variety of fun colors using natural ingredients like matcha powder and purple potato flour.

Unlike traditional mooncakes primarily made of plain flour, snow skin mooncake is made of cooked glutinous rice flour. In this recipe, I also use regular rice flour, wheat starch (澄粉), sugar, corn oil, milk, and coloring ingredients. When it comes to the filling, choose your preferred flavors, such as the classic Lotus Seed Paste, Black Sesame Paste, and Red Bean Paste.
My snow skin mooncake recipe uses Egg Custard, a popular filling for this type of mooncake. Unlike other mooncakes served warm, snow skin mooncakes are served cold. Hence, taking the name “snow skin.”
What To Know About The Ingredients
- GLUTINOUS rice flour and REGULAR rice flour: Keep in mind that these two types of flour are completely different from one another. You can learn more about their differences by reading my guide – Rice Flour Vs Glutinous Rice Flour.
- When it comes to origin, glutinous rice flour is derived from short or long-grain glutinous rice or sticky rice, while regular rice flour is made from milled long or medium-grain white rice, such as japonica, sinandomeng, angelica, or indica.
- Glutinous rice flour makes the cake sticky, chewy, and firm, whereas regular rice flour helps keep its shape and makes it less sticky. Rice flour alone produces a slightly chewy texture.
- Glutinous rice flour is typically white, while regular rice flour comes in two colors: white rice flour and brown rice flour. You can use either white or brown, but using brown rice flour will slightly change the color of the mooncake.
- Wheat starch (澄粉): Wheat starch is important for color in making the snow skin mooncake slightly translucent. You can substitute wheat starch with cornstarch or tapioca starch. However, cornstarch or tapioca starch will not make it as translucent as compared to when using wheat starch.
- Sugar: You can use any type of sugar if you want to add a bit of sweetness to the mooncake. Use white sugar, maple syrup, brown sugar, coconut sugar, muscovado, or agave.
- Corn oil: Corn oil is commonly used for baking and desserts for its lightweight and neutral taste. It also helps add moisture and fluffiness to the mooncakes. Other neutral-tasting oils to use are peanut oil, soybean oil, or vegetable oil.
- Milk: Milk adds a rich and creamy taste and texture. You can use regular milk, coconut milk, or any plant-based milk for a vegan version.
- Coloring ingredients: Make it fun and colorful with natural coloring ingredients. I use green matcha powder and purple potato flour. Other natural ingredients to use are green spinach powder and pink beetroot juice. Don’t add coloring ingredients if you prefer plain white snow-skinned mooncakes.
- Filling: Last but not least, choose your favorite filling flavors.
- The filling should be soft and paste-like. Generally, the proportion of dough to filling is 30g dough to 20g filling. It should not be too small or too big for the dough wrapper. I recommend making the paste in advance to cut your cooking time shorter for the mooncake recipe.
- In this recipe, I use Egg Custard from my Cantonese Steamed Egg Custard Buns (Nai Wong Bao) Here are other excellent options to choose from:
Expert Tips When Making Snow Skin Mooncakes
- Proper handling of the mooncakes
- Allow the dough to cool and become firmer before handling it. If it is too warm, it will be challenging to hold and mold because it is sticky.
- Dusting the mooncakes and molds
- Dusting the mooncake with flour also helps with the stickiness when handling. You can dust the molds and the dough when shaping it. Lightly dusting the molds is also important to prevent the mooncake from sticking to the mold and deforming as it is unmolded.
- However, take caution as you do not want to over-dust it and overload it with too much flour. Adding too much flour can cause the mooncake not to follow the intricate patterns of the mold when pressed.
- Choosing the mooncake mold
- You can use any shape and pattern you like. Molds can be for 50g or 100g mooncakes. However, I do recommend using a mold with a screw rod or stamp to push out the mold easily. An alternative to mooncake mold is a cookie stamp, which also has a similar molding mechanism.
- Mooncake molds are available for purchase in Chinese stores or online such as Amazon or eBay.
- Coloring the mooncakes
- When adding coloring ingredients, make sure to do it gradually and little by little until you achieve your desired color. You can even out the color by kneading the dough thoroughly. For a more colorful effect, use two or more colors in one piece of dough.
- Preventing a sticky dough
- A sticky dough can occur if the batter is not cooked properly. If you think it is too sticky for kneading, you can extend the steaming time of the batter.
- Storing the snow skin mooncakes
- The best time to eat snow skin mooncakes is as soon as it is made. Once in the fridge, it becomes firmer than the desired texture. If you have leftover mooncakes, store them in an airtight container to preserve their texture.
- Keep them in the fridge for up to three days or in the freezer for a more extended period. If storing in the freezer, wrap each one with cling wrap and store it all together in an airtight container.
Kitchen Tools And Ingredients To Make Snow Skin Mooncakes
This no-bake recipe only requires a steamer or any streaming techniques to cook the batter. Aside from a steamer, you can steam without a steamer in 5 ways: pan with steamer rack, microwave, pan with sieve, rice cooker, and instant pot. The only special tool you need is the decorative mooncake mold.
In addition to the basic kitchen tools, you will need these items:
Kitchen Tools
- Mixing bowl
- Whisk
- Clean wrap
- Steamer
- Kitchen gloves or food-grade gloves
- Mooncake mold
Ingredients
- 50g of glutinous rice flour
- 50g of regular rice flour
- 35g of wheat starch (澄粉)
- 30g of sugar
- 20g of corn oil
- 200ml of milk
- Natural coloring ingredients
- green matcha powder
- purple potato flour
- Filling: I use my custard filling recipe, which contains the following:
- 4 egg yolks
- 50g white sugar
- 180g milk
- 30g milk powder
- 40g all-purpose flour
- 40g cornstarch
- 30g butter
Instructions: How To Make Snow Skin Mooncakes
What you’ll love about making this recipe is that it does not require baking. Moreover, you don’t need to be a pro to make this as long as you follow my recipe instructions step by step.
Watch my quick tutorial video on Instagram or TikTok to see the results and steps. Once you are done making it, don’t forget to leave a comment below or tag @kitchenmisadventures to share your beautiful creations! Here’s how to make snow skin mooncakes:
Make The Custard Filling (Please refer to my recipe Cantonese Steamed Egg Custard Buns for detailed instructions)
- Whisk the egg yolks, white sugar, milk, milk powder, flour, cornstarch, and butter in a mixing bowl. Whisk until smooth and free of lumps.
- Strain the mixture with a strainer and heat on low heat in a non-stick pan.
- Stir continuously and continue heating until paste-like and thick enough to form a ball.
- Divide the custard filling into equal parts and shape each into a 20g round ball.
Cook The Batter
- In a bowl, add the glutinous rice flour, regular rice flour, wheat starch, sugar, corn oil, and milk. Mix all the ingredients thoroughly using a whisk.
- Pour the mixture into a steam-safe bowl and cover it with plastic wrap.
- Steam the batter for 20 minutes.
- Allow it to cool after steaming.The mixture should become firm to hold its shape but soft for kneading.

Knead And Shape The Dough
- Knead the dough for about 5 minutes. Use kitchen gloves to make it easier to handle without sticking.
- Then, wrap it with plastic wrap and refrigerate it for 1 hour. Make sure it is sealed so that no air can enter.
- Next, divide the dough into three equal portions.
- Add the coloring ingredient to two dough portions: one with matcha powder and another with purple potato flour.
- Knead each portion thoroughly until the color is evenly distributed.

- With the three dough portions, create smaller balls or “ice skin” by combining two colors or making single-colored balls. As you can see, I created white, green, purple, purple with white, and green with white balls.
- Create portions of 30g balls of “ice skin” and 20g of the custard filling.

- Flatten each ball into a small circular wrapper and place the custard filling in the center.
- Seal the filling inside the ‘ice skin’ and dust it with cooked glutinous rice flour to prevent sticking.
- Use the mooncake mold to create decorative patterns on the mooncakes. Before placing it in the mold, tap off any excess flour from the dough. To help it unmold smoothly, lightly dust the mold before molding it.
- Gently remove the cake from the mold by pressing the screw rod or spring bar slowly.

- Chill the mooncakes in the fridge to serve them cold. Pair these mooncakes with other special goodies like Chinese Turnip Cake (Lo Bak Go), Homemade Chinese Fa Gao (Fortune Cake), and Chinese Water Chestnut Cake (Ma Tai Gou).
Festive Snow Skin Mooncakes
Equipment
- Whisk
- Clean wrap
- Steamer
- Kitchen gloves or food-grade gloves
- Mooncake mold
Ingredients
- 50 g of glutinous rice flour
- 50 g of regular rice flour
- 35 g of wheat starch 澄粉
- 30 g of sugar
- 20 g of corn oil
- 200 ml of milk
- Natural coloring ingredients
- green matcha powder
- purple potato flour
Filling: I use my custard filling recipe, which contains the following:
- 4 egg yolks
- 50 g white sugar
- 180 g milk
- 30 g milk powder
- 40 g all-purpose flour
- 40 g cornstarch
- 30 g butter
Instructions
- Make The Custard Filling
- Whisk the egg yolks, white sugar, milk, milk powder, flour, cornstarch, and butter in a mixing bowl. Whisk until smooth and free of lumps.
- Strain the mixture with a strainer and heat on low heat in a non-stick pan.
- Stir continuously and continue heating until paste-like and thick enough to form a ball.
- Divide the custard filling into equal parts and shape each into a 20g round ball.
- Cook The Batter
- In a bowl, add the glutinous rice flour, regular rice flour, wheat starch, sugar, corn oil, and milk. Mix all the ingredients thoroughly using a whisk.
- Pour the mixture into a steam-safe bowl and cover it with plastic wrap.
- Steam the batter for 20 minutes.
- Allow it to cool after steaming.The mixture should become firm to hold its shape but soft for kneading.
- Knead And Shape The Dough
- Knead the dough for about 5 minutes. Use kitchen gloves to make it easier to handle without sticking.
- Then, wrap it with plastic wrap and refrigerate it for 1 hour. Make sure it is sealed so that no air can enter.
- Next, divide the dough into three equal portions.
- Add the coloring ingredient to two dough portions: one with matcha powder and another with purple potato flour.
- Knead each portion thoroughly until the color is evenly distributed.
- With the three dough portions, create smaller balls or "ice skin" by combining two colors or making single-colored balls. As you can see, I created white, green, purple, purple with white, and green with white balls.
- Create portions of 30g balls of "ice skin" and 20g of the custard filling.
- Flatten each ball into a small circular wrapper and place the custard filling in the center.
- Seal the filling inside the 'ice skin' and dust it with cooked glutinous rice flour to prevent sticking.
- Use the mooncake mold to create decorative patterns on the mooncakes. Before placing it in the mold, tap off any excess flour from the dough. To help it unmold smoothly, lightly dust the mold before molding it.
- Gently remove the cake from the mold by pressing the screw rod or spring bar slowly.
- Chill the mooncakes in the fridge to serve them cold. Pair these mooncakes with other special goodies like Chinese Turnip Cake (Lo Bak Go), Homemade Chinese Fa Gao (Fortune Cake), and Chinese Water Chestnut Cake (Ma Tai Gou).
Hi, can you clarify what you mean by steaming the batter? Are you talking about a bain-marie/double boiler/water bath, where you put the bowl of batter on top of a boiling pot of water so it gently heats? Thank you!