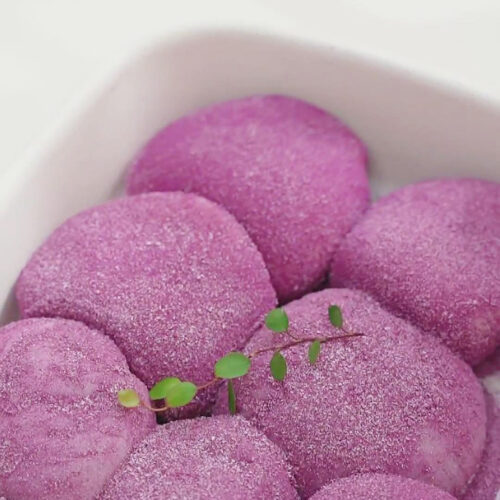
Soft, chewy, and nutty – what’s not to love about this taro mochi recipe? Indulge in its delectable mochi dough made with glutinous rice flour that is filled with the goodness of taro paste. It is a recipe that the whole family can enjoy eating and the kids will surely have fun making.
What Is Taro Mochi?
Mochi is a Japanese rice cake that is usually round and chewy. This dessert is typically served on special celebrations, such as Japanese New Year, Children’s Day, and Girls’ Day, but it is also a beloved dessert eaten all year round. Its main ingredient is glutinous rice flour, often combined with cornstarch, white sugar, milk, and butter.

The cherry on top – its luscious creamy filling! You can eat mochi in various flavors, such as strawberry mochi, mango mochi, and red bean mochi. In this recipe, I use taro paste as its nutty and purple filling.
You can also change it up a bit by choosing other fillings like yam paste, lotus seed paste, and purple sweet potato paste. Unlike in my red bean mochi recipe where I steam the mochi dough, I only pan-fry it for this taro mochi recipe before kneading and assembling it with the filling. As a final touch, the assembled mochi is coated with purple potato powder and milk powder for a lovely purple outer layer and a touch of milkiness.
All About The Taro Filling
You will love taro for its earthy and nutty taste, as well as its starchy and soft texture. The taro filling is made from steamed taro mixed with butter, milk, whipping cream, and purple potato powder. Everything is blended until you get a smooth paste.
Once you have this paste, you can even make taro bubble milk tea or steamed taro bun. When making the taro filling, it is important to note a few precautionary measures when eating and handling taro. For your information, taro contains high amounts of oxalate crystal.
With that in mind, taro can be toxic when eaten raw and can potentially cause skin irritation for some people when handled with bare hands. So, make sure to cook the taro thoroughly before eating it and wash your hands after touching it. It helps to wear kitchen gloves when chopping or handling taro to avoid skin irritation.
Why Use Glutinous Rice Flour For The Mochi Dough?
I want to touch base on the importance of glutinous rice flour for the mochi’s texture. As you already know, the texture you are going for is a sticky and chewy rice cake. The only ingredient that can make that texture is glutinous rice flour.
This special flour is made from glutinous rice or sticky rice. And no, it does not contain gluten. The word “glutinous” only refers to its glue-like texture when cooked.
Unfortunately, there are no other types of flour that can do the same quality of stickiness as glutinous rice flour. So, I highly recommend getting this special ingredient in advance to make the ideal mochi. Just so you know, this is different from rice flour and cannot be interchanged.
Rice flour is made from long or medium-grain white rice, such as japonica, sinandomeng, angelica, or indica. Using rice flour will only produce a slightly chewy texture without the stickiness. Learn more about their characteristics with my comprehensive guide, Rice Flour Vs Glutinous Rice Flour.
Ingredient Substitutes And Recipe Techniques
If it is your first time making mochi or you simply need more guidance and suggestions, do not skip this part! To help you, I’ve listed some essential tips and tricks below. If you are thinking of using alternatives for ingredients, check out my recommendations in this section.
Mochi Dough
- Glutinous rice flour: As you already know, no alternative can create the same sticky and chewy texture of glutinous rice flour. So, avoid replacing this from the recipe and prepare this in advance.
- Check your local Asian supermarket or order this from online stores like Amazon.
- However, if you are left with no choice but to make this without glutinous rice flour, you can try experimenting with tapioca starch. Although it can create a chewy texture, it does not have the stickiness of glutinous rice flour. Moreover, you will have to play around with the correct amount and add a bit of sugar to make it sweet-tasting.
- If you have leftover glutinous rice flour, make these recipes as well: Homemade Ham Sui Gok 咸水角 (Fried Glutinous Rice Dumplings)or Festive Snow Skin Mooncakes.
- Cornstarch: Cornstarch makes mochi chewier and thicker. If you don’t have cornstarch, swap it with these alternatives:
- All-Purpose Flour (1:1 ratio)
- Arrowroot Powder (1:1 ratio)
- Tapioca Starch/Flour (1:1 ratio)
- Potato Starch (1:1 ratio)
- Rice Flour (1:1 ratio)
- Sugar: To maintain the white color of the mochi, I recommend using white sugar. You can use any type of sugar to adjust the sweetness level. In case you don’t mind the color changing, brown sugar, coconut sugar, cane sugar, or muscovado sugar will add a hint of brown to the mochi.
- Milk: Mochi dough is made creamy and milky using milk. You can use regular milk, plant-based milk, or coconut milk for a stronger coconut flavor. If you don’t have milk, you can use water, but the mochi will not be as rich or creamy.
- Butter: Adding butter to the mochi dough enhances its elasticity, structure, and richness. Use salted or unsalted butter, vegetable shortening, or dairy-free butter.
- Coating: Mochi won’t be complete without its outer powdered coating. Use a mix of purple potato powder and milk powder. Purple potato powder makes it purple and milk powder adds a milky taste. You can replace milk powder with soy powder, cashew powder, or coconut powder. Add a hint of coconut by coating it with coconut flakes or shredded coconut as an alternative.
- Cooking method: After mixing the mochi dough mixture, it has to be cooked on a non-stick pan to make it firm and semi-solid. On low heat, the dough clumps and eventually turns into a bouncy foldable dough. Alternatively, steaming the dough is also possible. You can follow the steps on how I steamed the dough with the recipe Soft & Squishy Red Bean Mochi. If you don’t have a steamer, you can still steam in 5 techniques: pan with steamer rack, microwave, pan with sieve, rice cooker, and instant pot.
Taro Paste Filling
- Taro: Use fresh, frozen, or canned taro. Taro is normally available in Asian supermarkets or in the international section of grocery stores. It has brown-grayish skin and white flesh with purple specks. If you need an alternative, replace it with purple sweet potatoes. Make use of your extra taro by making Taro Balls for Homemade Taro Bubble Milk Tea Recipe or Grass Jelly Recipe (Dessert With Drink).
- Purple potato powder: Although taro has tiny purple specks in the flesh, it won’t give the filling its deep purple color. That is why I added a small amount of purple potato powder to make it more purple. For a more natural food coloring, use steamed purple potatoes instead of powder.
- Whipping cream: Whipping cream or light whipping cream contains about 30% to 35% milk fat. Adding this makes the filling thick and creamy. If you want it thicker, you can use heavy whipping cream and adjust the amount accordingly. Other alternatives to use are plant-based light cream, coconut cream, coconut milk, melted butter with milk, and evaporated milk.
- Milk: Adding milk to the filling creates a silky consistency. It will make it smoother and less thick without making it too watery. Soy milk, oat milk, or almond milk are excellent options. If you don’t have milk, you can replace it with water and extra whipping cream.
- Butter: To enhance the flavor and retain its moisture, I add a bit of butter as well. The filling becomes soft and rich due to the butter. You can also substitute butter with margarine, vegetable shortening, vegan butter, cream cheese, yogurt, or nut butter.
- Alternative: For a different version of taro paste, follow how I made taro in my Taro Paste guide and Sweet & Fluffy Steamed Taro Bun. If you want your mochi to have a variety of flavors, use the following fillings:
- Mango and other fresh fruits
- Yam paste
- Lotus seed paste
- Purple sweet potato paste
- Black sesame paste
- Red bean paste
- Matcha bean paste
- Cheesecake
- Mung bean paste
- Ice cream
The Essential Ingredients And Kitchen Tools

Apart from baking tools like a rolling pin and dough cutter, you will need a steamer, a non-stick pan, and a blender. Don’t forget to wear kitchen gloves if taro causes skin irritation for you. I also suggest having a sieve to have a smooth dough and a kitchen weighing scale to measure the ingredients accurately.
Kitchen items:
- Knife and chopping board
- Steamer
- Mixing bowls
- Whisk
- Sieve
- Non-stick pan
- Spatula
- Kitchen gloves
- Blender
- Kitchen weighing scale (optional)
- Rolling pin
- Dough cutter
- Piping bag
Mochi dough:
- 200g of glutinous rice flour
- 60g of corn starch
- 30g of sugar
- 320g of milk
- 30g of butter
- Coating (purple potato powder and milk powder)
Taro filling:
- 500g of taro (peeled and chopped)
- 40g of butter
- 70g of milk
- 120g of whipping cream
- 8g of purple potato powder
Recipe Steps To Make Taro Mochi
I divided the steps into 4 main parts: steam the taro, make the mochi dough, blend the taro filling, and assemble the mochi. It will probably take an hour or more to complete the recipe. For more guidance, watch my recipe tutorial reels on Instagram or TikTok!
Steam The Taro:
- Peel and cut the taro into blocks.
- Steam the chopped taro for 30 minutes or until soft for blending.
- Set aside.


Make The Mochi Dough:
- In a bowl, combine glutinous rice flour, cornstarch, sugar, and milk.
- Stir the mixture with a whisk until smooth.
- Separate lumps from the mixture using a sieve as you pour it into a non-stick pan.
- Add butter and cook the mixture slowly on low heat. It should become a semi-solid dough with a bouncy and non-sticky consistency. Alternatively, you can choose to steam the mixture for 30 minutes. Watch how I steam the mochi dough with my recipe for Soft & Squishy Red Bean Mochi.
- When the dough firms up, pull it apart by hand for a few minutes to enhance its elasticity and strength.

Blend The Taro Filling:
- Blend the steamed taro, butter, milk, whipping cream, and purple potato powder.
- Blend until smooth like paste. It should not be too runny.


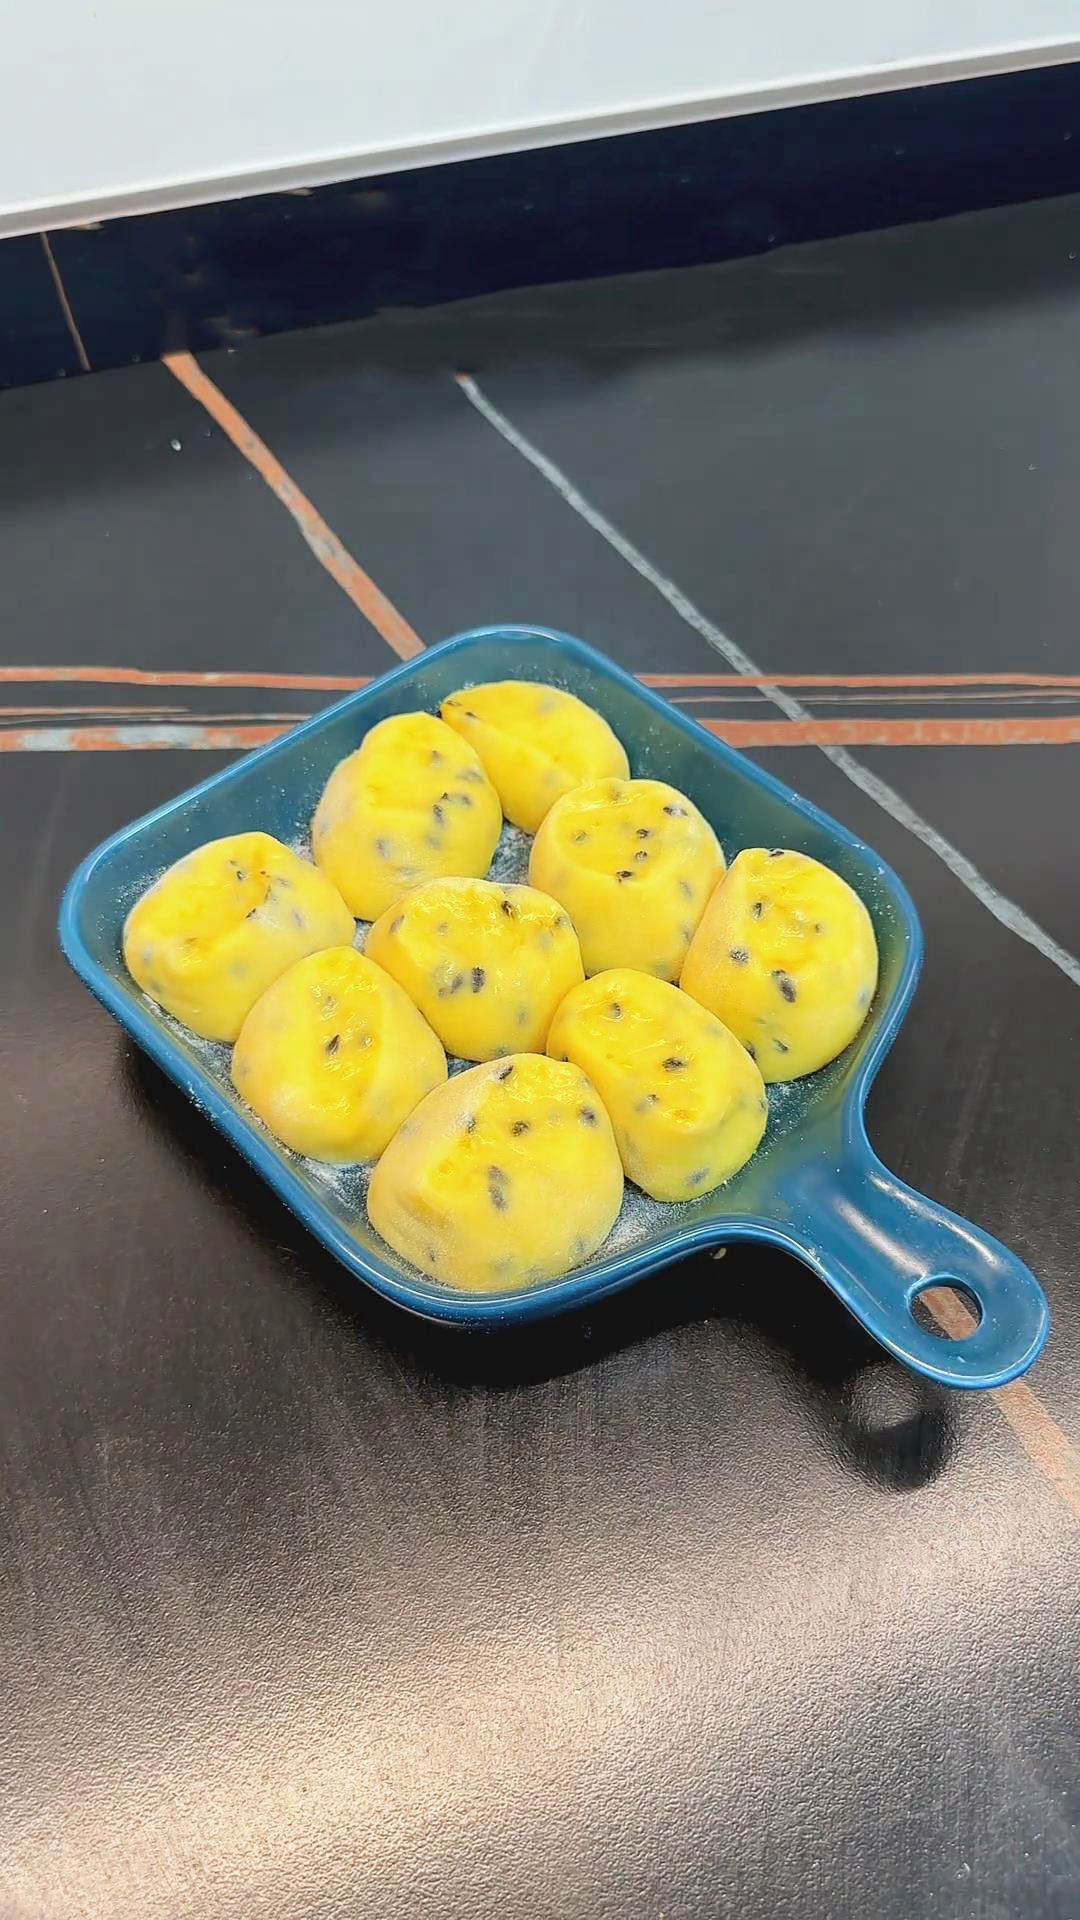
Assemble The Dough And Taro Filling:
- Roll the mochi dough into a log.
- Cut it into small portions about 1 inch wide.
- Use a rolling pin to flatten each piece of dough into a small circular wrapper.
- Transfer the filling to a piping bag for easy placement onto the dough wrapper. Alternatively, you can simply use a spoon to fill the center of the wrapper.
- Place the dough wrapper on top of a small bowl to allow the wrapper to take its shape as you pour the filling.
- Fill the center of the dough wrapper with taro filling.
- Seal the mochi by pinching the edges together. This should give you a round mochi.

- In a tray or flat container, mix purple potato powder and milk powder and coat the mochi.

Enjoy your homemade taro mochi with Homemade Taro Bubble Milk Tea or Avocado Gula Melaka Smoothie.
Taro Mochi Recipe With Taro Filling
Equipment
- Knife and chopping board
- Steamer
- Mixing bowls
- Whisk
- Sieve
- Non-stick pan
- Blender
- Kitchen weighing scale (optional)
- Dough cutter
- Piping bag
Ingredients
Mochi dough:
- 200 g of glutinous rice flour
- 60 g of corn starch
- 30 g of sugar
- 320 g of milk
- 30 g of butter
- Coating purple potato powder and milk powder
Taro filling:
- 500 g of taro peeled and chopped
- 40 g of butter
- 70 g of milk
- 120 g of whipping cream
- 8 g of purple potato powder
Instructions
Steam The Taro:
- Peel and cut the taro into blocks.
- Steam the chopped taro for 30 minutes or until soft for blending.
- Set aside.
Make The Mochi Dough:
- In a bowl, combine glutinous rice flour, cornstarch, sugar, and milk.
- Stir the mixture with a whisk until smooth.
- Separate lumps from the mixture using a sieve as you pour it into a non-stick pan.
- Add butter and cook the mixture slowly on low heat. It should become a semi-solid dough with a bouncy and non-sticky consistency. Alternatively, you can choose to steam the mixture for 30 minutes. Watch how I steam the mochi dough with my recipe for Soft & Squishy Red Bean Mochi.
- When the dough firms up, pull it apart by hand for a few minutes to enhance its elasticity and strength.
Blend The Taro Filling:
- Blend the steamed taro, butter, milk, whipping cream, and purple potato powder.
- Blend until smooth like paste. It should not be too runny.
Assemble The Dough And Taro Filling:
- Roll the mochi dough into a log.
- Cut it into small portions about 1 inch wide.
- Use a rolling pin to flatten each piece of dough into a small circular wrapper.
- Transfer the filling to a piping bag for easy placement onto the dough wrapper. Alternatively, you can simply use a spoon to fill the center of the wrapper.
- Place the dough wrapper on top of a small bowl to allow the wrapper to take its shape as you pour the filling.
- Fill the center of the dough wrapper with taro filling.
- Seal the mochi by pinching the edges together. This should give you a round mochi.
- In a tray or flat container, mix purple potato powder and milk powder and coat the mochi.